Friday, December 24, 2010

Sweet Homemade Gifts

Guys, I'm kind of in denial about Christmas. It's always a bittersweet time for me, and this year is especially difficult. I'm just not feeling it. But last night I managed to muster enough Christimas spirit to bake and package homemade gifts for some of our co-workers and friends.

I made a big batch of Barefoot Contessa's Outrageous Chocolate Brownies, which I doctored with 2 tablespoons of Knob Creek Kentucky Straight Bourbon. (Only the best for the best.) I topped half the batch with candied pecans and marshmallows, and broiled the mess until it was perfectly melty and toasty. (By the way, the marshmallows are from Chicago Soydairy and are the best ever. Plus, they're vegan, i.e., they contain no animal gelatin, which is grosssss.)

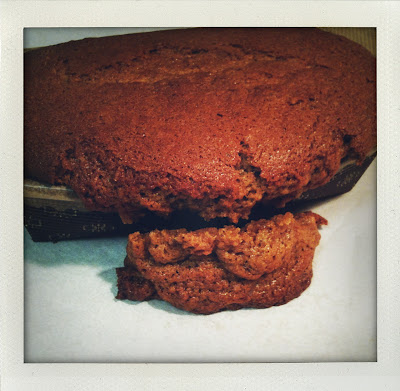
I also made three batches of peanut butter cookies (classic, chocolate chunk and peanut butter cup) and several mini loaves of pumpkin bread. I packaged everything in clear cello bags adorned with cookie cutters and green raffia ribbon. The gifts couldn't have been easier or more economical to make, and it felt great to see the smiles -- and chocolate -- on the recipients' faces. Aren't homemade gifts the best?


I also managed to bake a Christmas turd.


Merry Christmas to you and yours!

Tuesday, December 21, 2010

Dairy- and Gluten-Free Eggnog "Cheesecake" Squares

In light of yesterday's post about the evils of flour and sugar -- the hilarity of which I hope wasn't lost on you -- today's post about Eggnog "Cheesecake" Squares is nothing if not ironic. Yes, folks, it's another dessert recipe. And it's probably the most processed thing I've ever made, thanks to the use of gluten-free graham crackers and dairy-free cream "cheese". (The latter tastes and smells so chemical, I nearly gagged. Thankfully this goes away upon baking.)

But 'tis the season for giving -- and indulging -- so this post is a holiday gift to some of my favorite bloggers-slash-readers who avoid gluten and/or dairy. Lindsay, Katie and Stew, this one's for you. (And your friends and family, who won't have a clue these treats are dairy- and gluten-free.) Enjoy!

Note: These squares aren't vegan because they rely on eggs -- particularly yolks -- as a binder, but I have faith Katie can veganize them. Or Angela, who could add some of her homemade Vegan Nog. Yum.)


Eggnog "Cheesecake" Squares (Dairy- and Gluten-Free)
Makes 16 to 24 squares, depending on cut size
Adapted from Elizabeth's Eggnog Cheesecake Bars at MarthaStewart.com*

8 ounces gluten-free graham style crackers (I used Kinnikinnick Foods S'moreables), crushed or processed into fine crumbs
4 tablespoons Earth Balance Buttery Spread, melted
3 tablespoons plus 3/4 cup sugar
1 lb (two 8-oz tubs) non-dairy cream cheese substitute (I used one tub of Tofutti Better Than Cream Cheese and one tub of Follow Your Heart Cream Cheese Alternative. I have no idea why.)
2 large whole eggs
1 large egg yolk
1 tablespoon brandy (optional)
1 tablespoon pure maple syrup
1 teaspoon pure vanilla extract or vanilla bean paste (I used paste)
1 tablespoon certified gluten-free oat flour*
1 teaspoon cornstarch*
1 teaspoon ground nutmeg
Pinch salt
Vegetable oil cooking spray

1. Heat oven to 350 degrees F and coat a 9-inch square cake pan* with cooking spray. In a medium bowl, combine the graham cracker crumbs, melted Earth Balance and 3 tablespoons sugar. Press into bottom of pan and bake for 12 minutes, rotating pan halfway through. Set on wire rack to cool.

2. Meanwhile, in the bowl of an electric mixer fitted with the paddle attachment (you could easily mix this by hand), beat the cream cheese substitute on medium speed with the eggs, egg yolk, brandy, maple syrup, vanilla, 3/4 cup sugar, oat flour, cornstarch, nutmeg and salt until thoroughly combined and smooth. Pour filling over crust.

3. Bake on middle oven rack until filling is set, rotating pan halfway through, about 40 to 45 minutes. (This took exactly 40 minutes for me, and the filling puffed up like a souffle. However it deflated and became perfectly flat and smooth as it cooled.) Cool on a wire rack for about an hour, then cover and chill for at least 3 hours or up to 1 day.

4. Cut into bars and serve.

*Notes:

- You may remember my November announcement that I wanted to recreate my mom's tofu cheesecake for Thanksgiving, and that it was a flop which went missing from my holiday table. Then I bought the Martha Stewart Holiday Cookies magazine, fell in love with the Eggnog Cheesecake Bars (which have made the rounds on some blogs), and thought maaaaaybe I could take a traditional cheesecake recipe and make it dairy- and gluten-free. Bingo! These babies are outstanding and taste exactly like traditional cheesecake.

- I wasn't mad about the idea of using a 9" square cake pan because I could foresee disaster when trying to cut and remove the squares from the pan. I was right -- I mangled about half the squares. So I would recommend using a springform or tart pan with removable sides.

- If you don't have or don't like oat flour, omit it and increase the cornstarch to 1 1/2 teaspoons.

- I bought Silk Nog with the intention of using it in place of the 3/4 cup of dairy eggnog in the Martha Stewart recipe, but when I poured it from the carton I realized it was too watery. I tried cooking it down to the thickness of traditional eggnog, but to no avail. So I ditched it. To compensate, I doubled the nutmeg and added 1 tablespoon maple syrup.

- The Martha Stewart recipe calls for baking the pan of cheesecake squares in a water bath, but I didn't think it was necessary. I was right.

P.S. I know, I know -- more wretched photos. It's still raining, which means no light or outdoor shoots. Hastily "styling" and photographing these babies before rushing out the door to work doesn't help either. Especially when a restless puppy is gnawing on my ankles.

Monday, December 20, 2010

Easy White Bean, Swiss Chard and Butternut Squash Soup

It's been raining for days here in Southern California, which means two things:*

1. Soup; and
2. Wretched photos, thanks to zero light.

There's no end in sight to the rain, so before we wash away into the ocean I'll share my recipe for Easy White Bean, Swiss Chard and Butternut Squash Soup.

It's vegan. It's delicious. It's carnivorous-husband-approved.

If only it could make the rain stop.


White Bean, Swiss Chard and Butternut Squash Soup
Makes about 12 cups

1 1/2 tablespoons olive oil
1 medium white onion, finely chopped
3 stalks celery, finely chopped
3 medium carrots, peeled and finely chopped
Sea or kosher salt
4 cups vegetable stock
6 cups water
1 medium butternut squash, peeled, seeded and cut into 1/2 inch cubes (about 4 cups)
2 dried bay leaves
1 bunch Swiss chard, leaves only, loosely chopped (about 6 cups)
1 15-ounce can cooked white beans (such as Great Northern), drained and rinsed
Freshly cracked black pepper

1. In a large soup pot set over a medium flame, heat the olive oil. Add onions, celery and carrots and saute for about 5 minutes, until vegetables begin to release their juices. Sprinkle with about 1/2 teaspoon salt and saute for about 5 minutes more, until onions are transluscent.

2. Add the vegetable stock, water, butternut squash and bay leaves. Bring to a boil, reduce heat to simmer, and cook for about 10-15 minutes, until squash begins to soften. Add the Swiss chard and beans and simmer for about 5 minutes more. Season to taste with salt and pepper and serve.

*Days of nonstop rain also mean:

Stir crazy dogs;
A stir crazier puppy;
A puppy who dislikes pottying in the rain so much, she relieves herself on the door mat;
Frayed nerves on the part of The Headless Hound and us humans; and
A frantic, late-night plea to our dog trainer for help with puppy's incessant I'm-so-bored-I-could-bark-until-you-lose-your-hearing barking.

Please send help.

Saturday, December 18, 2010

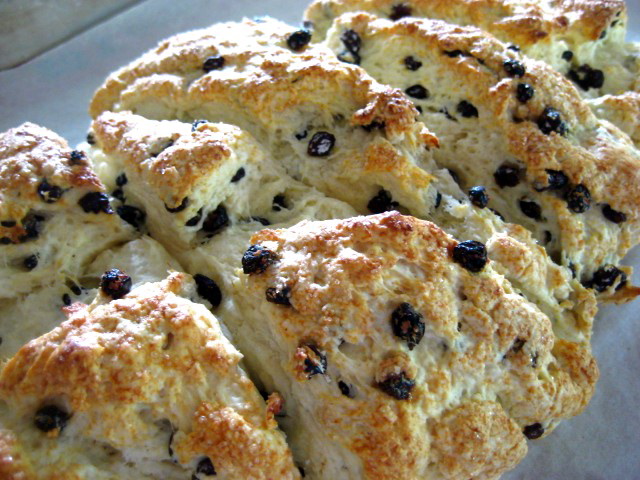
Mary's Currant Scones


In the past I've written about my mom's scones and how she'd bake them on Sundays while my dad spun reggae records on the living room turntable. It's one of my most treasured childhood memories and a tradition I hope to continue with my own children someday. (Though I suppose Laird and I will have to sort out whether we'll make Nana's or my mom's scones. Maybe we'll alternate?)

Light, buttery and studded with Zante currants, mom's scones weren't the dry, heavy sugar bombs you find these days at Starbucks. I've encountered scones like hers only once: at afternoon tea on The Veranda at the Moana Surfrider Waikiki. I enjoyed them so much, the hotel sent me home with a little box of them (but not the recipe). 

I don't have my mom's recipe, either, but with some experimentation I've come up with a close approximation. They're not quite the same, but if I put on some reggae, I can almost imagine she's here with me.

Mary's Currant Scones
Makes about 8

As with any scone or biscuit, the key here is to use a very light touch. Mix the ingredients and handle the dough as little as possible.

3 cups unbleached all-purpose flour
2 tablespoons sugar, plus more for sanding
1 teaspoon kosher or sea salt
3 tablespoons baking powder
3/4 cup Zante currants (Use raisins if you can't find Zante currants, but avoid the more widely available golden currants.)
6 tablespoons unsalted butter, very cold, cut into 1/4-inch pieces
1 1/4 cups whole milk, very cold
Half and half OR 1 egg yolk, whisked

1. Heat oven to 375 degrees F and line a baking sheet with parchment.

2. In a medium bowl, whisk together the flour, 2 tablespoons sugar, salt and baking powder. Add the currants and toss to coat with the flour mixture. Rub in the cold butter with your fingertips, working quickly so as not to warm the butter. The mixture should resemble very coarse cornmeal with large pea sized lumps of butter throughout. Add the milk all at once and gently stir until the dough just begins to come together. Turn it a few times in the bowl to pick up the dry flour bits at the bottom.

3. Transfer the dough to the prepared baking sheet and quickly shape it into a rectangle about 1 1/4 inch thick. Cut the rectangle on the diagonal to form 8 wedges (see below). Brush with half and half or whisked egg yolk, and sprinkle with sugar. 


4.  Bake for 18-25 minutes, rotating pan halfway through, until scones are golden brown on top and sound hollow when tapped. Cool on a rack for 5 minutes, break into wedges, and serve with butter and jam.

Scones are best served warm, on the day they're made. However, I've had success freezing and then reheating them in a 350 degree F oven.


Friday, December 17, 2010

Roasted Brussels Sprouts with Bacon Cider Vinaigrette


Say the words, "Brussels sprouts" to most people, and they gag at the mere thought. At this very moment you're probably remembering a scene from your childhood: sitting at the dinner table well after the rest of the family was excused, held hostage by a plate of boiled Brussels sprouts your parents insisted you eat just one of before you could rejoin humanity.

Shame on all those parents who boiled Brussels sprouts into soggy, bitter oblivion. Because, when prepared properly, they're divine. (As are broccoli, cauliflower, mushrooms, asparagus, and so many other vegetables to which people are averse.)

So... How does one prepare them properly? Toss them in olive oil, roast them until they're soft on the inside and caramelized on the outside, and generously season them with salt and pepper. (I like mine with lots of sea salt, a la French fries.)

And those of you not averse to meat should flavor them with a simple vinaigrette of cider vinegar and lots of crispy bacon -- but only if it's certified humane and all natural.

Roasted Brussels Sprouts with Bacon Cider Vinaigrette
Makes 6 to 8 servings (recipe can be halved or multiplied)

For the roasted Brussels sprouts:
2 lbs whole Brussels sprouts, washed and trimmed of any tough or brown outer leaves
2 tablespoons extra virgin olive oil (I prefer a good quality oil with intense fruity and peppery flavors)
Sea or kosher salt
Freshly ground black pepper

For the bacon cider vinaigrette (optional):
1/2 to 3/4 lb bacon, cut into 1/2-inch pieces
1 tablespoon apple cider vinegar

1. Heat oven to 375 degrees F and line a baking sheet (or two, depending on size) with parchment paper or aluminum foil. Trim any browned ends off the sprouts, then slice them in half.


2. Arrange the sprouts on baking sheet(s), drizzle with olive oil and toss to coat.


3. Roast for 35 to 45 minutes, stirring and tossing them around halfway through, until sprouts are softened on the inside and crispy on the outside. Remove from oven, season to taste with salt and pepper, and serve.


To make the Bacon Cider Vinaigrette, cut 1/2 lb to 3/4 lb pound of bacon into 1/2-inch pieces. Saute in a heavy-bottomed skillet or pan until brown and crispy. Carefully drain the fat from the pan (I do this several times while the bacon cooks), leaving about 3/4 tablespoon bacon fat. Add the roasted Brussels sprouts and apple cider vinegar, toss to combine, and serve.

Monday, December 13, 2010

Caramelized Stuffed French Toast CHALLAnge


Once upon a time my friends Jake and Reagan went to Philadelphia to run a half marathon. But before they got to racing, they got to eating -- my kind of people. On the pre-race menu: Stuffed Caramelized Challah French Toast at Sabrina's Cafe. And then they (quite sportingly) CHALLAnged me to recreate it. (Reagan came up with the awesome name.)

It was a long time coming, but yesterday I finally got it together and threw down for the challenge. I honestly had no idea what I was doing -- I haven't tasted Sabrina's French toast, nor any other stuffed French toast -- but Reagan was kind enough to give me a hint: the cream cheese was whipped and flavored with cinnamon. The rest was just a matter of mixing up some ingredients I thought went well together.

I flavored reduced fat whipped cream cheese with maple syrup, cinnamon and orange zest, and spiked the egg custard with the same, plus nutmeg.

Although challah is braided, I was only able to find a traditional loaf shape.
And I see now that I should have made Mickey Mouse French toast.


How did it turn out? In a word: perfect.

This would be just the thing to whip up for house guests or a special occasion. The effort and time involved (about 20 minutes start to finish) are deceptively minimal for such an impressive result. Everyone will think you slaved over it, to which you can honestly respond: it was no trouble at all.
Caramelized Stuffed Challah French Toast
Serves two (recipe can be multiplied)

For the cream cheese filling:
1/4 cup cream cheese (I used a reduced fat whipped variety, which was too salty for my taste. I suggest you go with full fat Philadelphia cream cheese which is more creamy and less salty.)
2 tablespoons pure maple syrup (Laird didn't think the cream cheese filling was sweet enough, so you might consider increasing the maple syrup or adding honey or sugar.)
1 teaspoon orange zest
1/2 teaspoon ground cinnamon

For the toast:
Four slices challah bread, sliced one inch thick (You could substitute another rich bread such as brioche loaf.)
2 large eggs
1/2 cup whole milk
1/4 cup pure maple syrup
1/2 teaspoon pure vanilla extract
1 teaspoon orange zest
1/2 teaspoon ground cinnamon
1/4 teaspoon ground nutmeg

For serving:
One banana, sliced
Pure maple syrup
Powdered sugar

1. In a small bowl, stir together the cream cheese filling ingredients until thoroughly combined. Spread a generous tablespoon (each) on two pieces of bread. Spread the filling to about 1/2-inch from the crusts so that it doesn't ooze out the sides during cooking. Place the plain bread slices on top of the slices with cream cheese filling, sandwich-like.

2. In a medium bowl, whisk together the eggs, milk, maple syrup, vanilla, orange zest, cinnamon and nutmeg. Transfer the mixture to a shallow baking dish and place one cream cheese "sandwich" in the mixture. Press down gently to ensure it absorbs lots of custard. Turn over and repeat on the other side.

3. Meanwhile, lightly coat a griddle or skillet with cooking spray and heat it to medium. Transfer the custard-soaked "sandwich" to the griddle and cook for about 3-5 minutes on each side, until brown and caramelized. Slice in half and arrange on a plate with sliced bananas. Drizzle generously with pure maple syrup, dust with powdered sugar, and serve. Repeat steps 2 and 3 with remaining "sandwich."

Jake and Reag, it was super fun cooking for you.

Wednesday, December 08, 2010

About That Pumpkin Bread Pudding...


I've mentioned a time or a hundred that I made -- say it with me now -- Bobby Flay's Pumpkin Bread Pudding for Thanksgiving. (Twice, actually: once as directed, and again with the extra custard from Flour's Super Pumpkiny Pumpkin Pie.)

I've also told you a time or a hundred that you really ought to make it. Or at least the pumpkin bread, which is the. Best. Ever.

The end.


Kidding. Some simplifying tips:

  • All of the components -- pumpkin bread, custard and sauces -- can be made a day or two in advance, and the pudding assembled the day you serve it. 
  • Neither the Crème Anglaise nor the Spicy Caramel Apple Sauce are musts; the pudding is fantastic unadorned or topped with whipped or ice cream.
  • That said, the Spicy Caramel Apple Sauce is easy to prepare and imparts a distinctive zing. 
  • As with all recipes calling for pumpkin purée, make your own if you're able. It makes all the difference.
  • Heck, make this with sweet potato or butternut squash purée if you'd like. (Just be sure to strain the water from the butternut squash.)
  • Speaking of straining, make sure to strain the custard as directed. Even better, make a half recipe of the filling for Flour's Super Pumpkiny Pumpkin Pie -- which doesn't need to be cooked or strained -- and use it in place of the custard.

What are you waiting for? Make it already. Sheesh.

Rubber Soul


Image: MTV

Today, the 30th anniversary of John Lennon's murder, I mourn him as do millions of fans the world over. Though I was very young when he was shot and my memory is fuzzy, I remember my parents giving me the shocking news. More than what was said, I recall images and emotions: I pictured Lennon being gunned down in front of his apartment on that dark, cold night. I felt confused, sad and angry, and I asked my parents to explain the inexplicable: why.

Music was as revered in my family as food and education, and my relatives -- whose record collections were staggering -- exposed me to a range of genres. My grandparents and their siblings appreciated classical and opera; my dad loved rock and roll and the blues; and my mom was partial to jazz and reggae. They took me to the opera and the symphony; to music appreciation society meetings; and to festivals and concerts (some of which they organized). I even met Stevie Ray Vaughan once, at a blues festival where he recorded a promo for my dad's weekly radio program, "Blues People." 

I loved all of the music I was exposed to -- still do -- but The Beatles were my favorite. As a child I listened to them for hours while I played with my toys, singing along to the tinny tracks warbling from the Panasonic cassette player I carried everywhere.

Rubber Soul was my favorite Beatles album (probably in part because my dad had nicknamed me Rubber Belly Tomato Seed), and Michelle was my favorite song. Alhough Paul McCartney sings vocals on the track, today I'm listening to it and remembering Lennon and my dear, departed family members. Especially my mom, who would tirelessly translate the French lyrics for me over and over again (which was silly when you think about it). We reminisced about this during her final days; I treasure that conversation and the intimacy of it.

Sometimes I like to imagine that my family is having a big jam session up in heaven. Stevie Ray Vaughan, Jimi Hendrix, Janis Joplin, Bob Marley, John Lennon, Mozart, Bach, Bizet... Maybe they're all up there performing for Dad, Mom, Papa, Mama, Aunt Flora and Uncle Ben. (Wouldn't that be something to see and hear.)

They're no longer with us, but the music they wrote, performed and loved is. And I'm forever grateful for it and them.

Monday, December 06, 2010

Latkes and Cookies


Last night we had a lovely -- and delicious -- time at our friend Stacey's annual Latke and Holiday Cookie Exchange party. The above photo doesn't begin to do justice to Stacey's delicious latkes, which have got to be one of the most labor intensive labors of love there is. (Thanks, Stacey!)

I brought coconut cranberry chocolate chip cookies, which I thought were a riff on the Coc-Oat-Nut Chocolate Chip cookies I used to sell when I had my bakery business. Until, that is, I showed up at the party and realized I had subconsciously copied the Coconut-Cranberry Chews Stacey had made the year before -- from a recipe on the back of a Challenge Butter package.

It was like Inception: The Cookie Exchange.

Coconut Cranberry Chocolate Chip Cookies
1/2 cup (1 stick) unsalted butter, firm but not cold
1/2 cup brown sugar
1/2 cup granulated sugar
1/2 teaspoon kosher or sea salt
1 large egg, room temperature
1/2 teaspoon pure vanilla extract
2 cups unbleached all purpose flour
1 teaspoon baking powder
2 cups sweetened flaked dried coconut
1 cup dried cranberries
1/2 cup chocolate chips
Optional: 2 teaspoons orange zest or 1/8 teaspoon pure orange oil

1. Heat oven to 350 degrees F and line two baking sheets with parchment paper and/or silicone baking mats.

2. In the bowl of a stand mixer fitted with the paddle attachment, cream the butter, sugars and salt for about 2 minutes, until the mixture is light and fluffy. Add the egg and vanilla and beat to combine. (If using, add orange zest or oil at this point.) Turn off the mixer.

3. In a medium bowl, whisk together the flour and baking powder. With the mixer on low, slowly add the flour mixture to the butter mixture and beat until it just begins to incorporate. Stop the mixer again and add the coconut, cranberries and chocolate chips. Beat on low just until combined. (At this point the dough can be wrapped tightly in plastic wrap and refrigerated for up to 2 days.)

4. Using a tablespoon or cookie scoop, drop rounds of dough onto prepared baking sheets, spacing about 1-1/2 inches apart. Bake for 16 to 20 minutes or until the tops and edges are golden, rotating baking sheets (top to bottom and front to back) halfway through baking.

Sunday, December 05, 2010

Super Pumpkiny Pumpkin Pie


I've been making a version of Flour Bakery + Cafe owner Joanne Chang's  banana bread for years, and thought it fitting that I inaugurate the recent addition of her new cookbook, Flour: Spectacular Recipes from Boston's Flour Bakery + Cafe, to my library by making her Super Pumkiny Pumpkin Pie for Thanksgiving. I have a soft spot for pastry chefs such as Chang who use adjectives like "pumpkiny," and write their recipes with instructions to "unfurl" and "pleat," which sound a lot like "twirl in your pleated skirt."

True to its name, this pie is super pumpkiny -- the result of cooking the pumpkin down to a paste so that it withstands the shocking quantities of milk and cream in the recipe. (This pie is not for the faint of heart.) True to form, I took some minor liberties with it. I used homemade pumpkin purée (something I always go to the trouble to make because I prefer the taste so); cooked it down for 7 minutes instead of 40 to 45;  and added 1/4 cup pure maple syrup and 1 tablespoon brandy.

A word to the wise: although Chang states that the recipes for both the filling and the Pate Brisee II (see below) yield enough for one 9-inch pie, I found that both made enough for at least two pies. No worries. I happened to be simultaneously making Bobby Flay's Pumpkin Bread Pudding, so I substituted the extra pie filling for the custard in his recipe, and froze the extra dough. If you're not in the same predicament (and what a predicament it was), halve the recipe, make two pies or visit Food Network for a version that appears to yield a single pie.

Happy baking, and be sure to unfurl and pleat as instructed.

Laird thinks I should trademark this, um, interesting pie angle.

Super Pumpkiny Pumpkin Pie
Makes (ahem) one 9-inch pie.

Pate Brisee II (recipe follows)
One 16 ounce can pumpkin purée (I made my own.)
2/3 cup packed light brown sugar (I used dark brown, as it's all I had.)
1 teaspoon ground ginger
1 teaspoon ground cinnamon
1/2 teaspoon freshly ground nutmeg
Pinch of ground cloves
1/2 teaspoon kosher salt
1/2 cup plus 2 tablespoons sweetened condensed milk
2/3 cup evaporated milk
3 eggs
1 egg yolk
3/4 cup heavy cream
1/2 teaspoon vanilla extract

My additions:
1/4 cup pure maple syrup
1 tablespoon brandy

1. Remove the dough from the refrigerator. On a well-floured work surface, roll out the dough into a circle about 12 inches in diameter and 1/8 inch thick. Roll the dough circle around the pin and then unfurl it on top of a 9-inch aluminum pie pan or glass pie dish. Press the dough gently into the bottom and sides of the pan. Evenly pleat the overhanging dough with your fingers to create a decorative edge, or use scissors to trim the overhang, leaving a 1/4-inch lip (to allow for shrinkage in the oven). Refrigerate the pie shell for at least 30 minutes. (The pie shell can be tightly wrapped in plastic wrap and refrigerated for up to 1 day or frozen for up to 2 weeks. Bake directly from the refrigerator or freezer.)

2. Position a rack in the center of the oven, and heat the oven to 350 degrees F.

3. Line pie shell with parchment paper, fill with pie weights, and blind bake for 35 to 45 minutes, or until the entire shell is light brown all the way through.

4. Meanwhile, scrape the pumpkin purée into a medium saucepan and stir in the brown sugar. Place over medium-low heat and cook, stirring occasionally with a wooden spoon, for 40 to 45 minutes, or until the pumpkin has reduced to a somewhat thick paste and darkened. Remove from the heat and whisk in the ginger, cinnamon, nutmeg, cloves and salt. Then whisk in the sweetened condensed milk and evaporated milk.

5. In a large bowl, whisk together the eggs and egg yolk until blended. Slowly whisk in the cream and vanilla (and the maple syrup and brandy, if using), then gradually whisk in the pumpkin mixture and continue whisking until thoroughly mixed.

6. When the pie shell is ready, remove from the oven and leave the oven set at 350 degrees F. Remove the weights and parchment, and pour the pumpkin custard into the shell.

7. Bake for 55 to 60 minutes, or until the custard is just set. The edges of the custard will puff up a little and the center should still have a little wiggle in it. Let cool on a wire rack for at least 2 hours. Serve at room temperature or chilled. (I found this pie tasted best after being refrigerated for 24 hours.)

8. The pie can be stored in an airtight container in the refrigerator for up to 3 days.

Pâte Brisée II
Makes about 10 ounces dough, enough for (ahem) one 9-inch single-crust pie, 10-inch crostata or 9-inch quiche.

1 cup unbleached all-purpose flour
2 teaspoons sugar
1/2 teaspoon salt
1/2 cup plus 1 tablespoon (1 stick plus 1 tablespoon) cold unsalted butter, cut into 8 pieces
1 egg yolk
2 tablespoons cold milk

1. Using a stand mixer fitted with the paddle attachment (or a handheld mixer), mix together the flour, sugar and salt. Scatter the butter over the top and mix on low speed for about 45 seconds, or until the flour is no longer bright white and holds together when you clump it and pecan-size lumps of butter are visible throughout.

2. In a small bowl, whisk together the egg yolk and milk until blended. Add to the flour-butter mixture all at once. Mix on low speed for about 30 seconds, or until the dough barely comes together. It will look really shaggy and more like a mess than a dough.

3. Dump the dough out onto an unfloured work surface and gather it together into a tight mound. Using your palm and starting on one side of the mound, smear the dough bit by bit, starting at the top of the mound and then sliding your palm down the side and along the work surface (at Flour we call this "going down the mountain") until most of the butter chunks are smeared into the dough and the dough comes together. Do this once or twice on each part of the dough, moving through the mound until the whole mess has been smeared into a cohesive dough with streaks of butter.

4. Gather up the dough, wrap tightly in plastic wrap, and press down to flatten into a disk about 1 inch thick. Refrigerate for at least 4 hours before using. The dough will keep in the refrigerator for up to 4 days or in the freezer for up to 1 month.

Thursday, December 02, 2010

Mile High Apple Pie with Spicy Caramel Sauce


I eat apples year round -- they've been a favorite (and daily) snack since I was a child -- but I especially look forward to apple season each year. I'm smitten with fresh-from-the-orchard heirloom varieties brimming with crispy crunch and bright flavor. I'm particularly fond of Sierra Beauties, which I discovered in 1994 and, quite by accident, made into the best pie ever. (Sorry to toot my own horn, but...1994, guys! Sierra Beauties are that good.)

Sadly, this year apple season pretty much passed me by. But I am enjoying the last few late-harvest organic Arkansas Black apples from Whole Foods, and I did manage to turn a pile of humble Granny Smiths into a Mile High Apple Pie for Thanksgiving.


Spicy and comforting, this pie even has a sauce. I highly recommend you make it for your next gathering or random craving. I know it looks like a lot of steps, but I'm nothing if not overly-descriptive. Making it is a simple, satisfying endeavor.


Mile High Apple Pie with Spicy Caramel Sauce
Makes one 8- or 9-inch pie

Perfect dough for double-crust pie:
2/3 cup cold water
1 teaspoon kosher salt
3 cups unbleached all-purpose flour, measured with the scoop and sweep method
3/4 cup (1-1/2 sticks or 12 tablespoons) unsalted butter, very cold, cut into 1/2-inch cubes
1/2 cup (4 tablespoons) cream cheese, very cold, cut into 1-inch pieces
5 tablespoons vegetable shortening, very cold

Filling:
9 medium Granny Smith apples, peeled, cored and cut into eighths
Juice of 1 lemon
1 teaspoon pure vanilla extract (or 1 tablespoon vanilla bean paste)
1 tablespoon apple brandy or liquor of choice (optional)
3/4 cup brown sugar, tightly packed
1/4 cup unbleached all-purpose flour
1/2 teaspoon kosher salt
1 teaspoon cinnamon
1/4 teaspoon ground nutmeg
1/8 teaspoon ground allspice
Pinch ground cloves
1/4 cup heavy cream
4 tablespoons unsalted butter, cold, cut into 1/2-inch cubes
1 cup half and half
Granulated or sanding sugar

Egg wash:
1 large egg yolk
2 tablespoons water, milk, cream or half and half (don't say I don't give you choices)

1. Make the pie dough:
Dough can be made in a large bowl with a pastry cutter, in a stand mixer fitted with the paddle attachment, or in a food processor.
- Dissolve salt in water and keep it very cold. (I make the saltwater in a glass measuring cup and set it in the freezer.)
- Cut butter into flour just until large pea-sized lumps remain.
- Add cream cheese and vegetable shortening and gently stir, mix or pulse until the cheese and shortening are just incorporated. Big shaggy lumps should remain.
- Add water in a slow, steady stream -- all the while gently stirring, mixing or pulsing -- until dough just comes together.
- Transfer dough to a floured surface, knead gently a few times and cut in half. Shape into balls, flatten into discs about 1 inch thick, wrap in plastic and refrigerate for at least 2 hours.

2. Blind bake the bottom crust:
- Heat oven to 350 degrees F.
- Remove one pie dough disc from refrigerator and place it on a floured surface. Roll to a 10-inch circle and place it in an 8- or 9-inch pie dish with deep sides (at least 1-1/2 inches).
- Gently press dough into the corners and sides of dish and trim edges to no more than 1/4 inch from the top edge.  (Dough will shrink as it bakes.) Prick all over with a fork, line with parchment, fill with beans or pie weights, and "blind bake" for about 30 minutes or until evenly browned.
Note: I use the dough scraps to make decorative shapes for the top crust. Gather the scraps into a ball, wrap in plastic and refrigerate for at least 30 minutes.

3. Meanwhile, macerate the filling:
- In the biggest bowl you can find, toss the apples with lemon, vanilla, brandy, sugar, flour, salt and spices. Let sit at room temperature for about 30 minutes. 

4. Roll out the top crust:
- Remove the second dough disc (not the ball of scraps) from the refrigerator and roll out as instructed above, except this time make an 11-inch round.
- Cut a 1-1/2 inch circle (or other shape if you have small cookie or pie cutters) from the middle.

5. Make egg wash:
- In a small bowl, whisk the egg yolk with the water, milk, half and half or cream. 

6. Assemble pie:
- Add cream to the macerated apples, toss to combine, and transfer apples with half their juices to the bottom crust, piling high in the middle.
- Dot apples with the 4 tablespoons cold butter pieces.
- Center and lay top crust over apples, gently pressing it against them to avoid big air pockets.
- Use a pastry brush to apply egg wash to edges of bottom crust (I know this seems weird because the bottom crust is baked; work with me here), then press the top crust firmly against the bottom crust to form a seal. (The egg wash glues the crusts together.)
- Trim excess dough from around the edges and place pie in the refrigerator while you cut decorative shapes from the dough scraps.

7. Decorate and bake:
- On a floured surface, roll the ball(s) of scraps into a rectangle and cut decorative shapes such as leaves, apples or whatever strikes your fancy.
- Brush both sides of your decorative shapes with egg wash, remove pie from the refrigerator, and glue the pieces to the edges of the crust (they look quite pretty if they slightly overlap).
- Brush the surface of the top crust with egg wash, sprinkle with sugar and, if you have extra decorative pieces, glue them randomly or in a pattern on the surface of the crust.
- Prick crust with a fork if you like, for extra ventilation.
- Bake for about 45 minutes to an hour, or until the crust is nicely browned and the apples are soft and bubbling. (Tent with foil if the crust browns too quickly.)
- Remove from oven to cool and set. Serve warm, with ice cream and caramel sauce.

8. Make the caramel sauce:
- Bring reserved juices from macerating the apples to a simmer over medium-low heat.
- Cook, stirring constantly, until thickened, 1-2 minutes.
- Slowly stir in the half and half and cook for another minute or two. Serve warm, for drizzling over pie.

Wednesday, December 01, 2010

'Tis the Season: Gum Tree

[This is an independent, unsolicited and uncompensated post.]

Yesterday I mentioned the wonderful twig serving utensils I purchased at Gum Tree, and because it's December already (whoa), I thought I'd share more about my local destination for gifts, snacks and inspiration. Last year we bought nearly all of our holiday gifts at Gum Tree; every selection was perfect and we couldn't have felt better about supporting the business.

Owned and operated by Will and Lori Ford -- whose story is as charming as their shop/cafe -- Gum Tree is situated in a historic Craftsman home with a broad porch and lovely patio. The concept behind it is, "Think globally, shop and eat locally," and the Fords nailed it.

Lori uses her keen eye to stock the shop with irresistible finds for kids, adults and home, and she's always happy to special order or gift wrap something. In the cafe, restaurateur Will puts an Aussie spin on fresh California cuisine and serves the best coffee. On weekends we like to bring the Hounds for breakfast on the dog-friendly patio.

If you're in the area, don't miss it. They're offering complimentary hot apple cider to holiday shoppers, which is worth it alone. As are the Lamingtons.

If you're not local, call or email Lori for assistance with personal shopping, gift baskets and shipping. You won't be sorry.

Last weekend I picked up these handmade shell trees to decorate for Christmas.
We don't dare put up a real tree this year with a wild puppy on the loose.

Gift wrap is always offered and always complimentary.

Cutest. Eggs. Ever.

Dog-friendly patio.
Dog-friendly treats.