Monday, February 04, 2013

Levain-Inspired Chocolate Chip Walnut Cookies


Remember that time I proclaimed I'd made the best chocolate chip cookies ever? And that they were replicas of Levain Bakery's famous confections?

I was wrong.

Those cookies are fantastic, but I've since had the pleasure of actually eating Levain cookies, and those ain't them.

Part cookie, part scone, Levain's creations defy everything we've been taught about "the perfect cookie", as well as most of what I've read about Levain.

They're not exactly chewy, but they're not crispy either. They're tender, but not raw in the center. They're hefty and toothsome, each bite leaving you satisfied yet wanting more. They're full of complex flavor, but not distractingly so. They have all of the nostalgia and familiarity of America's favorite cookie, but somehow amplified and improved.

They're more, but not too much.

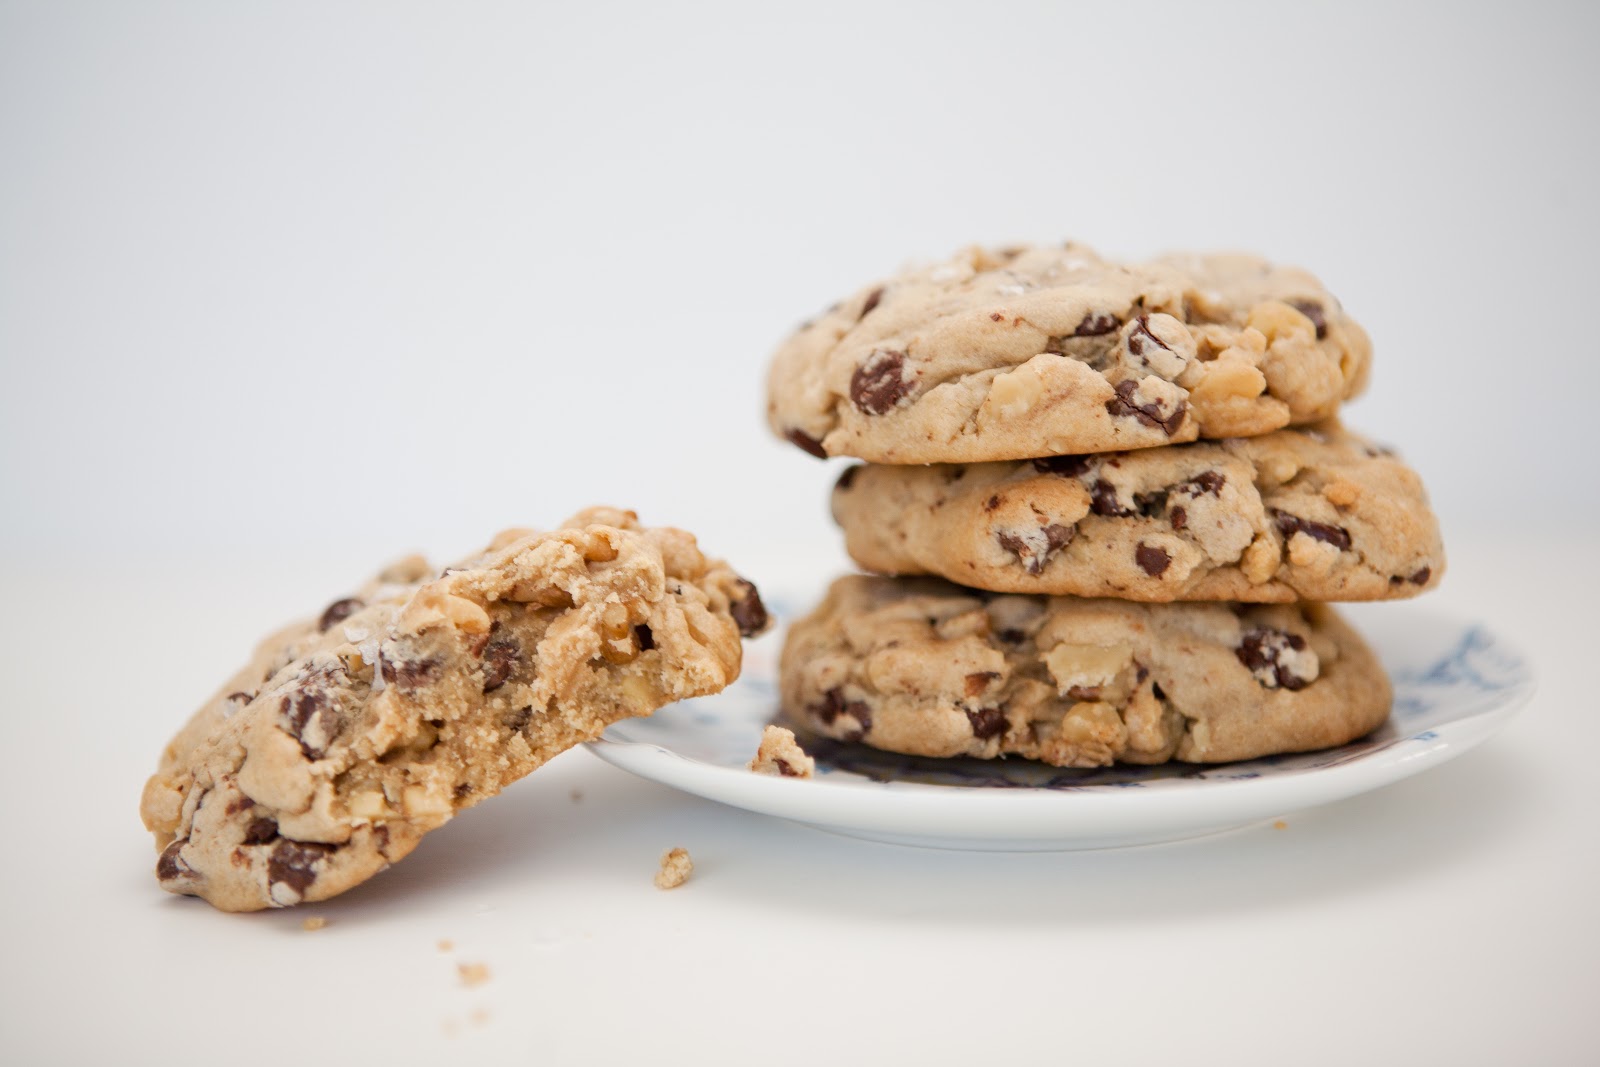
Since I live on the West Coast, I've been working on homemade versions for the past six weeks. Untold quantities of flour, butter and sugar later, I've not only come up with what I believe to be a close approximation of Levain's creations, but also gluten-free versions. (Thank you, Cup4Cup, for making a gluten-free flour that lives up to its promise of a 1:1 substitution for wheat flour in virtually any recipe.) And because I adore sea salt on my chocolate chip cookies, my recipe calls for a sprinkling of flaky Maldon before baking.

Gluten-free or not, I suggest you waste no time making these incredible cookies yourself. And don't bother with using frozen butter that's been cubed or grated, as so many Levain copycat recipes advise. I've tried those techniques and got the best results from the tried and true method of creaming ever-so-slightly softened butter with sugar. Nostaligia, indeed.


Salted Chocolate Chip Cookies with Toasted Walnuts
Makes about 9 (6-ounce) to 18 (3-ounce) cookies

Toasting the walnuts enhances their flavor, giving these cookies a wonderfully nutty crunch without a hint of bitterness. You can of course omit the walnuts or substitute another nut of choice, but if you're not allergic, do try them.

2 cups walnut halves
3 1/2 cups (17 ounces) all-purpose flour OR Cup4Cup Gluten-Free Flour
1 teaspoon baking powder
1/2 teaspoon baking soda
1 teaspoon Diamond Kosher salt
2 sticks (1 cup/8 ounces) unsalted butter, softened slightly but still cool to the touch
3/4 cup evaporated cane juice (or standard granulated sugar)
1/4 cup dark brown sugar
1/4 cup Turbinado (raw) sugar (for texture and flavor; you can substitute regular or brown sugar)
2 eggs, cold
1 Tablespoon pure vanilla extract or vanilla bean paste
2 cups (12 ounces) semi-sweet chocolate chips or chunks (recommended: Guittard Semi-Sweet Chocolate Chips or Scharffen-Berger 62% or 70% Cacao Baking Chunks)
Flaky sea salt (such as Maldon), for sprinkling (optional)

1. Toast the walnut halves: spread nuts on a baking sheet lined with parchment and bake at 350 degrees F for 12 minutes, tossing the nuts and rotating the baking sheet halfway through baking. Set aside to cool while you prepare the dough.

2. In a medium bowl, whisk together the flour, baking powder, baking soda and salt. Set aside.

3. In the bowl of a stand mixer fitted with the paddle attachment, cream the butter with the sugars until light and fluffy. Stop the mixer and scrape down the sides and paddle. Add the eggs, one at a time, mixing on low speed until incorporated. Add the vanilla and mix to combine.

4. Stop the mixer and add the flour mixture, chocolate chips or chunks, and toasted walnut halves. Mix, starting on the lowest speed and progressing to medium-low speed, until the mixture just comes together into a uniform dough. Be careful not to over mix, or the dough will become tough (or gummy, if using gluten-free flour).

5. Refrigerate the dough in an airtight container or plastic wrap for at least four hours or, preferably, two to four days.

6. When you're ready to bake the cookies, remove the dough from the refrigerator and let it stand at room temperature for about 30 minutes, or until it's softened a bit but still cold.

7. Line two half-sheet baking pans with silicone baking mats and/or parchment paper. Heat oven to 350 degrees F.

8. Portion the dough into 6-ounce or 3-ounce balls. (If you don't have a scale, use a half-cup or quarter-cup dry measure.) Place dough balls on baking sheets, spacing evenly apart and at least 2 inches from the sides, and sprinkle with sea salt if desired.

9. Bake for 12 minutes (for 3-ounce cookies) to 20 minutes (for 6-ounce cookies), or until golden brown on the sides and top but still soft in the middle. Be sure to rotate the baking sheets back to front and top to bottom halfway through baking. Remove the sheets from the oven and place on cooling racks for five minutes, then transfer cookies directly to racks to cool completely.

The cookies will keep in an airtight container at room temperature or in the refrigerator for up to four days, or in the freezer for up to a month. (Defrost cookies in plastic wrap or container to collect condensation.)

Sunday, February 03, 2013

Levain-Inspired Dark Chocolate Peanut Butter Chip Cookies


Perhaps the only thing better than a Levain Bakery Chocolate Chip Walnut Cookie is a Dark Chocolate Peanut Butter Chip one, still warm from the oven and gooey in the center.

However if you, like me, don't live near Levain and are even a little proficient at baking, please try these at-home versions. You can even make them gluten-free if that's your thing.


Dark Chocolate Peanut Butter Chip Cookies
Makes about 9 (6-ounce) to 18 (3-ounce) cookies

2 1/2 cups (12.5 ounces) all-purpose flour OR Cup4Cup Gluten-Free Flour
1/2 cup Dutch (alkalized) cocoa powder
1/2 teaspoon baking powder
1/4 teaspoon baking soda
1/2 teaspoon Diamond Kosher salt
1/2 teaspoon instant espresso powder (optional) (recommended: Medaglia d'Oro)
2 sticks (1 cup/8 ounces) unsalted butter, softened slightly but still cool to the touch
1/2 cup evaporated cane juice (or standard granulated sugar)
1/4 cup dark brown sugar
1/4 cup Turbinado (raw) sugar (for texture and flavor; substitute regular or brown sugar if desired)
2 eggs, cold
2 teaspoons pure vanilla extract or vanilla bean paste
2 cups (10 ounces) peanut butter chips (recommended: SunSpire)
1 cup (6 ounces) semi-sweet chocolate chips or chunks (recommended: Guittard Semi-Sweet Chocolate Chips or Scharffen-Berger 62% or 70% Cacao Baking Chunks)

1. In a medium bowl, whisk together the flour, cocoa, baking powder, baking soda, salt and instant espresso powder (if using). Set aside.

2. In the bowl of a stand mixer fitted with the paddle attachment, cream the butter with the sugars until light and fluffy. Stop the mixer and scrape down the sides and paddle. Add the eggs, one at a time, mixing on low speed until incorporated. Add the vanilla and mix to combine.

3. Stop the mixer and add the flour mixture, chocolate chips or chunks, and peanut butter chips. Mix, starting on the lowest speed and progressing to medium-low speed, until the mixture just comes together into a uniform dough. Be careful not to overmix, or the dough will become tough (or gummy, if using gluten-free flour).

4. Refrigerate the dough in an airtight container or plastic wrap for at least four hours or, preferably, two to four days.

5. When you're ready to bake the cookies, remove the dough from the refrigerator and let it stand at room temperature for about 30 minutes, or until it's softened a bit but still cold.

6. Line two half-sheet baking pans with silicone baking mats and/or parchment paper. Heat oven to 350 degrees F.

7. Portion the dough into 6-ounce or 3-ounce balls. (If you don't have a kitchen scale, use a half- or quarter-cup dry measure.) Place dough balls on baking sheets, spacing evenly apart and at least 2 inches from the sides. 

8. Bake for about 12 minutes (for 3-ounce cookies) to 20 minutes (for 6-ounce cookies), rotating the baking sheets back to front and top to bottom halfway through baking. Remove the sheets from the oven and place on cooling racks for five minutes, then transfer cookies directly to racks to cool completely. 

The cookies will keep in an airtight container at room temperature or in the refrigerator for up to four days, or in the freezer for up to a month. (Defrost cookies in plastic wrap or container to collect condensation.)

Monday, January 14, 2013

Buttermilk Biscuits with Bacon, Cheddar and Chives

I'm back, sort of. When the wonderful Miss Whistle asked me to share a favorite recipe for the January Jeliciousness series on her blog, I jumped at the opportunity. I do miss flexing my creative muscles (wee ones, mind you) by styling and photographing the things that I make. For I have not neglected my baking and cooking as I have this blog.

In the spirit of testing the waters for a possible return to more regular posting here on Flour Child, below is the recipe I'm sharing on Miss Whistle. I'll be back again soon, maybe. In the meantime, please visit Miss W's blog for recipes, musing and lovely things.
If the menu at David LeFevre's restaurant, M.B. Post, in my hometown of Manhattan Beach, California, isn't tempting enough already, the bacon cheddar biscuits are reason alone to dine there. Studded with smoky bacon and sharp cheddar, the dough is surprisingly tender and light. When my girlfriends and I meet at M.B. Post for brunch or dinner, you won't hear a single word about dieting, nor do we feign guilt at eating these biscuits. They're an utterly worthwhile indulgence.

And while I appreciate that many (most) of us are focusing on virtuous eating now that the holidays are over, there's something to be said for gently easing back into healthy habits. So rather than quitting the bacon, butter and cheese cold turkey, you might make these biscuits for your next supper or brunch. Just don't eat the entire batch (easier said than done), and maybe serve them with lighter fare.

Buttermilk Biscuits with Bacon, Cheddar and Chives
Lightly adapted from David LeFevre
Yield: 12

If you don't have a kitchen scale, get one. Weighing ingredients makes all the difference in baking, especially when it comes to light, flaky biscuits. Grating the frozen butter seems like a fussy step, but it's incredibly easy and tremendously helpful in ensuring the dough is evenly flecked with cold butter. Speaking of which, make sure all of your ingredients are cold. I measure and mix the dry ingredients into a Ziploc bag and chuck it in the freezer for 30 minutes. (The dry mix will keep for up to a month in the freezer, and having it on hand is a time saver.)

Ingredients:

12 ounces* (2 3/4 cups; see note, below) all-purpose flour
4 1/4 teaspoons baking powder
1 1/4 teaspoons baking soda
1 teaspoon kosher salt (recommended: Diamond brand)
1 ounce (2 generous Tablespoons) sugar
1 stick unsalted butter, frozen, grated (grate the butter onto a plate and keep it in the freezer while you prep the remaining ingredients)
6 ounces sharp cheddar cheese, diced into 1/4 inch pieces (1 1/4 cups measured after dicing)
6 ounces (3 1/2 slices) bacon, cooked until crispy, drained, and cut into 1/4 inch pieces
1 ounce fresh chives, finely chopped (scant 1 cup measured after chopping)
1 cup buttermilk, cold, shaken thoroughly before measuring
1 Tablespoon clarified butter (melt 2 Tablespoons unsalted butter, cool, and skim milk solids off the top)
Flaky sea salt, such as Maldon, for sprinkling

*The Los Angeles Magazine version of this recipe states that 12 ounces of all-purpose flour equates to 1 1/2 cups. When I measure 12 ounces of King Arthur All-Purpose Flour using the spoon and sweep method, I get 2 3/4 cups every time.

Method:

1. Heat oven to 375 degrees F and position a rack in the middle of the oven.

2. In a medium bowl, whisk together the flour, baking powder, baking soda, salt and sugar. Add the frozen grated butter and mix gently with a spoon until evenly distributed.

3. Add the cheddar cheese, bacon and chives and gently mix again to combine.

4. Pour the cold buttermilk into the mixture and gently fold it in until a dough begins to form. Turn out onto a lightly floured surface and, with a light touch, knead the dough with your hands until it comes together. (Be careful not to overwork the dough, or it will toughen.)

5. Gently roll out the dough to 1 1/4 inch thickness and cut into 2 1/2 inch squares or rounds.

6. Brush the biscuits with clarified butter and sprinkle with Fleur de Sel.

7. Arrange the biscuits on a baking sheet lined with a silicone baking mat and/or parchment or waxed paper and bake for 12-20 minutes, or until golden brown and cooked through. (Use a toothpick, skewer or cake tester to test the centers for doneness. In my oven, these biscuits take 20 minutes and I rotate the baking sheet after 10 minutes to ensure even browning.)

8. Remove the biscuits from the oven and let set for 5 minutes before serving. (I dare you to resist the crispy cheese bits that ooze onto the baking sheet as the biscuits bake.)

Minus the bacon, cheddar and chives, this recipe makes the absolute best plain biscuits; they're perfectly light and flaky with a crisp exterior and soft interior. (I dare say, they're better than Scott Peacock's version.) Do experiment with other savory or sweet mix-ins, and let me know how they turn out.