Wednesday, June 30, 2010

Bottega Louie

I hit the jackpot yesterday. I got out of my office (outside!) and walked (during working hours!) to Bottega Louie for lunch (not at my desk!) with a friend.

I'm not a restaurant critic, and you'll find more thorough reviews of Bottega Louie on CitySearch and Urban Spoon, so I'll just say this: it's the kind of place one expects to find in New York, Europe, or Cape Town, not Downtown L.A. But it's in Downtown L.A., so...love!

I hadn't seen my friend in some time, and when I told him that Bottega Louie is known for their Napolitano pizzas (it was his first time at Bottega), he told me he's given up gluten and dairy. No pizza? No problem. He had the mache salad, and I had the free range roast chicken (not pictured) and a side of roasted asparagus with egg and Parmesan.

Mache, frisee, avocado, chicken, celery, olive oil, & lemon

Roasted asparagus with egg and Parmesan

Our meals were good, but not outstanding. (Gjelina's shaved asparagus with egg blows Bottega's away.) But it didn't matter because it was so great to catch up with my friend and, after he dashed back to work, I got to move on to the main draws (for me, anyway): the Market Pantry and the Patisserie.

Check out this bread spread:


And the cheese case!

The pastry cases. Oh, heavens me.


Did I mention the candy?

Mini jawbreakers. I DIE.

I bought a box of macarons to give to a colleague back at the office...


...and a jar of Maggie Beer Burnt Fig Jam for myself. (I couldn't resist.)


It's got but three ingredients: figs (65%), sugar, and lemon juice. I tried a couple bites of it last night -- by itself and with a bite of Alden's Organic Vanilla Bean Ice Cream (told you I was feeling bold). I can't decide if I like it. I'm just going to have to try it on toast tomorrow. Life is hard.

Wednesday, June 23, 2010

Vegan Minestrone

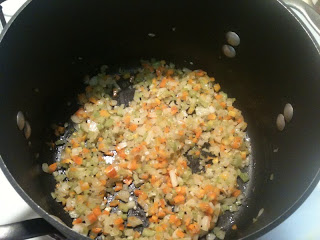
When I was in college, my great aunt Flora (gardener, foodie, all-around amazing human being), taught me how to make Minestrone. It's based on a recipe she clipped from the San Francisco Chronicle Food Section many, many years ago. Were she here now, Flora would tell you that the soffritto (the Italian variation of mirepoix) is the most important element, and it's true. Without it, the soup lacks flavor and depth.

One of my favorite things about this recipe is that you can play around with the ingredients, substituting vegetables and legumes to suit your tastes and the seasons. You could also add pasta, protein, grains...you get the idea.

Vegan Minestrone
Makes about 18 1-cup servings

For the soffritto:
2 tablespoons olive oil
1 small (or 1/2 of one large) white onion, diced very fine
1 large carrot, peeled and finely diced very fine
2 stalks celery, diced very fine
2 garlic cloves, peeled and minced

For the soup:
2 cups vegetable stock
1 28-oz can crushed tomatoes with basil
3 cups water
1 15-oz can kidney beans, drained and rinsed
1 15-oz can garbanzo beans, drained and rinsed
2 medium zucchini, cut into 1/2-inch chunks
2 medium yellow (summer) squash, cut into 1/2-inch chunks
1 teaspoon dried oregano (or 2 teaspoons fresh, minced)
1 bunch Swiss chard, stalks removed and leaves roughly chopped
salt and freshly-ground pepper
2 tablespoons pesto

1. Saute the soffritto: In a medium or large soup/stock pot over medium high heat, saute the onion, carrots and celery in the olive oil until the onion is translucent and the vegetables release their juices. This takes about 10 minutes; a sprinkle of salt aids the process. Add the garlic and saute for a minute or two. (Adding the garlic any earlier will cause it brown and become bitter.)

2. Make the soup: Add the vegetable stock, tomatoes and water. Increase heat to high and bring to a low boil. Add the beans, zucchini, yellow squash, and oregano. Reduce heat and simmer, stirring occasionally, for about 5-8 minutes or until the zucchini and squash start to get tender. Stir in the Swiss chard and simmer for another 5 minutes, until the chard starts to get tender. Season to taste with salt and pepper. (I'm guessing I use about 1/2 teaspoon salt and 1/4 teaspoon pepper. But I like my food salty.)

3. Just before serving, stir in the pesto. Don't cook the soup after you've added the pesto; doing so will dampen its bright flavor.


SOFFRITTO PREPPED FOR THE POT


SOFFRITTO, PRE-SAUTE
SOFFRITTO, SAUTEED AND READY FOR THE GARLIC

Monday, June 21, 2010

One Love, Two (Batches Of) Scones


Growing up, one of my family's many food traditions was reggae and scones on Sundays. My dad would spin records on the living room turntable while my mom turned out rustic, currant-studded scones from our tiniest of kitchens.

Though my dad is no longer with us, for Father's Day yesterday I honored him (and our family's tradition) by firing up some reggae and scones. Twice.

I put a new twist on tradition by using my husband's grandmother's (Nana's) recipe for South African scones. While my mom's scones were triangular, flaky and slightly sweet, South African scones are unsweetened, round, and more like biscuits from the American South. They're really just a vehicle for jam (typically apricot or strawberry) and unsweetened, freshly-whipped cream.

Some other distinctions worth mentioning:

1. In South Africa, "scone" is pronounced "sk-ON," not "sk-OHHH-n" When I was first dating my husband, I tried to impress him by making sk-OHHH-nz. Not only was I making them in the American style and adding currants (oh, the horror!), I was mispronouncing the very word.

2. As is the rule when making biscuits, the key to success with Nana's scones is to use a very light touch. Overworking the dough will result in a hockey pucks, not scones.

3. Speaking of hockey pucks: always make certain your baking powder is fresh. Read on to see why.

Nana's Scones
Makes 6 (2 3/4-inch) scones
2 cups unbleached all-purpose flour (recommended: King Arthur Organic)
3 teaspoons baking powder (aluminum-free or homemade)
1/4 teaspoon salt
2 tablespoons unsalted butter, cold, cut into 1/4 inch pieces
1/2 cup milk (traditionally whole, but I use 2% with good results)
1 large egg
water

1. Heat oven to 450 degrees F and line a baking sheet with a silicone baking mat or parchment. (I usually use both, and highly recommend the use of silicone baking mats for their insulating and heat-distribution properties. I also swear by commercial-grade aluminum jelly roll pans.)

2. In a medium bowl, whisk together the flour, baking powder and salt. Quickly rub the butter into the flour mixture with your fingertips until the mixture is a bit more coarse than coarse cornmeal. You want some pea-sized lumps to remain.


3. Measure 1/2 cup milk in a liquid measuring cup. Add the egg and whisk to combine. You need 3/4 cup of liquid, so, if needed, whisk a bit of water into the milk-egg mixture until you have 3/4 cup total.


4. Add the milk mixture to the flour mixture and gently stir with a fork until it the dough forms a ball. Turn out onto a well-floured surface and sprinkle evenly with flour. Flour your hands and gently pat the dough into a round, making a couple gentle passes with a floured rolling pin until the round is about 3/4-inch thick.


5. Stamp scones from the dough using a 2-3/4-inch round biscuit cutter, gently gathering the scraps and re-shaping the dough one or two more times until you've used all of it. (Do not overwork this dough!) Be sure to employ a biscuit-cutting technique, pressing the biscuit-cutter straight down into the dough without turning or wiggling it, then gently pulling the dough away from the rounds you've cut.


6. Place the rounds on the prepared baking sheet and bake on the center oven rack for 8-12 minutes, checking the scones for even browning (and rotating the baking sheet back-to-front if needed) after 6 minutes.


Ahem. Except my scones didn't rise and I ended up making them all over again.

It all went wrong with an innocent little tin of baking powder.

The Culprit

You see, baking powder and baking soda have limited shelf lives -- generally about 6 months when stored in a cool, dry place. After which, they lose their ability to make things rise.

I know this.

But when I began making my Father's Day scones, I spaced on the fact that I was out of baking powder, thanks to the previous week's baking frenzy. No biggie, I thought, I'll just make homemade baking powder from cream of tartar and baking soda. Nope. I was out of cream of tartar, too. But I did find a little tin of baking powder when I was rooting around in the cupboard for leavening agents. I was so happy with my discovery, I didn't even bother to check the expiration date. I just whisked the baking powder into my flour and proceeded onward.

Turns out the baking powder was two years old. And old baking powder = hockey pucks.


Hockey Puck

So I went to the market, bought a fresh tin of baking powder (and some cream of tartar), and started over. The upside is, my dad's memory was honored not once, but twice also.

Scone

Sunday, June 13, 2010

Nuttzo Granola with Cinnamon, Pepitas & Apricots

Inspired in part by Sweet Tater's (almost) instant Peanut Butter Apricot Granola, and in part by the jar of Peanut Free Nuttzo that's threatening to send my daily calorie intake into the stratosphere, I've been experimenting with homemade granola. I think I've arrived at a recipe that's not too sweet and provides a healthy dose of whole grains, omega 3s, fiber and protein.

I cannot recommend Nuttzo enough, but you could substitute your favorite nut butter. And you could make all sorts of other substitutions and alterations. That's the beauty of this recipe: you could use raw honey, dried apples or berries (unsulfured and unsweetened, of course), walnuts, sunflower seeds, and so on.
Note: I add the apricots to the granola after it's been baked, to prevent them from getting tough/dry. But that's just my preference; you could bake the apricots with the rest of the mixture.

Nuttzo Granola with Cinnamon, Pepitas & Apricots
Makes 6 cups

Ingredients
3 cups rolled oats
1/2 cup dry roasted unsalted almonds, roughly chopped
1/2 cup dry roasted pepitas (pumpkin seeds)
1 teaspoon cinnamon
1/4 teaspoon salt
1/2 cup Peanut Free Nuttzo
1/3 cup maple syrup (not the fake stuff)
1 teaspoon vanilla extract (again, not the fake stuff)
1 cup dried apricots, roughly chopped

1. Preheat oven to 375 degrees F. Line a baking sheet with parchment.

2. In a medium bowl, stir together the oats, almonds, pepitas, cinnamon and salt.

3. Add the Peanut Free Nuttzo, maple syrup and vanilla extract, mixing with a spoon and/or your hands to break up any big clumps.

4. Spread on the prepared baking sheet and bake on the middle oven rack for 10 minutes. Remove the granola (on the baking sheet) from the oven and stir and redistribute it on the baking sheet. Return it to the oven and bake for another 5 to 10 minutes, to your desired doneness. Remove from oven and set on a rack to cool.


5. Transfer to a bowl or storage container and add the apricots, stirring to combine. The granola should keep for a week or more when stored in an airtight container.

My husband likes this granola with plain Greek yogurt, berries and raw honey.

Lemon Buttermilk Chocolate Chip Cookies

Today I couldn't resist making my Lemon Buttermilk Chocolate Chip Cookies for a visit with some dear friends I haven't seen in nearly a year. They absolutely adore these cookies, and I have a hard time showing up to people's houses without a batch of cutely-packaged homemade cookies in hand.
Lemon Buttermilk Chocolate Chip Cookies
Makes about 2 1/2 dozen

Note: This dough needs to rest in the refrigerator for at least an hour before baking.

Ingredients
2 cups unbleached all-purpose flour, measured with the spoon-and-sweep method
2 teaspoons baking powder (I use aluminum-free)
1/2 cup (1 stick) unsalted butter
1 cup sugar
1/4 teaspoon salt
1 teaspoon lemon zest
1 egg
1 teaspoon Grand Marnier (optional)
1/2 teaspoon vanilla extract
1/4 to 1/2 teaspoon lemon oil, to taste (NOT lemon extract or lemon flavoring)
1/4 to 1/3 cup buttermilk*
6 ounces (1/2 package) semi-sweet chocolate chips

*If you don't have buttermilk on hand (or you don't want to buy a whole quart just for this recipe), you can make your own from milk and distilled white vinegar, cream of tartar or lemon juice (e.g., from the lemon you zested for this recipe). Simply heat 1/2 cup of milk in the microwave for about 15 seconds (or until warm), stir in 1/2 teaspoon vinegar, cream of tartar OR lemon juice, and let it stand at room temp until it curdles, which takes about 15 to 20 minutes. Voila!

1. In a small bowl, whisk together the flour and baking powder. Set aside.

2. In the bowl of an electric mixer fitted with the paddle attachment, beat the butter, sugar, salt and lemon zest until light and fluffy. (I like to use a BeaterBlade for this recipe. Which I bought and am in no way being compensated to endorse.)


3. Stop the mixer and add the egg, Grand Marnier (if using), vanilla extract and lemon oil. Beat together at medium speed until well-combined.

4. Stop the mixer and add the flour mixture, beating at low speed until it just starts to come together.


5. Slowly add 1/4 cup to 1/3 cup buttermilk, stopping the addition as soon as the dough starts to become moist and before it appears wet. (You want a moist cookie dough, not cake batter.) Stop the mixer and add the chocolate chips, then mix on low speed until the chips are just incorporated.


6. Cover the dough tightly with plastic wrap and refrigerate for at least an hour (and up to 24 hours). (I transferred my dough to a small bowl to free up my mixer bowl for banana bread in the meantime.)

7. When the dough has rested in the refrigerator for at least an hour (long enough to make friends with your eggs and soy-free Earth Balance), remove it from the frige, heat your oven to 375 degrees F and line two baking sheets with silicone baking mats, parchment or both. Using a small cookie scoop or spoon, drop 1 1/2 to 2 inch balls of dough onto prepared cookie sheets, spacing 2 inches apart.


8. Bake at 375 degrees F for 12-14 minutes, rotating baking pans top to bottom and back to front after the first 7 minutes. When cookies are golden brown and set, remove from oven to cooling racks. Cool for 2 minutes, then remove cookies (still on the silicone baking mats or parchment) to racks to cool completely.


As you can see from the photo at the top of this post, I like to stack these cookies in clear cello bags, tie them with pretty ribbon, and give them away.

Banana Bread (Walnuts Optional)

What to do when you're in the midst of a baking frenzy and you're being stared down by the bowl of ripe bananas on your kitchen counter? Make banana bread.

I've experimented with literally dozens of banana bread recipes, and below is my (and my husband-the-primary-banana-bread-eater's) hands-down favorite. I adapted it from Flour Bakery's Famous Banana Bread recipe on foodnetwork.com.

I don't usually put walnuts in my banana bread because I find they distract from the banana flavor. But they're a good source of healthy fats and fatty acids, fiber, protein and antioxidants, so today I added them. Alas, the bread tasted more like walnut bread, so I'll be going back to eating walnuts by themselves or in salads, etc.


Banana Bread (Walnuts Optional)
Makes 1 loaf

Ingredients
3 large, very ripe bananas
1 2/3 cups unbleached all-purpose flour
1/2 tsp baking soda
1/2 tsp salt
1/2 tsp cinnamon
2 large eggs
1 cup sugar
1/2 cup vegetable oil (I use walnut oil, which imparts a rich, nutty flavor)
3 tbsp nonfat plain Greek yogurt, creme fraiche or sour cream*
1 tsp pure vanilla extract
1/2 to 1 cup walnuts, chopped (optional)

*Note: If you're avoiding dairy, leave out the yogurt/creme fraiche/sour cream and add another 1/2 banana. You could (and I will) also experiment with replacing the oil with applesauce or pear puree, and the wheat flour with a gluten-free alternative.

1. Preheat oven to 325 degrees F and lightly coat a loaf pan or 8 x 8 x 2 square baking pan with cooking spray.

2. Puree or mash the bananas and set aside. I puree mine in a blender, because banana chunks tend to "sink" the batter (i.e., it doesn't rise as well). Oh, and you should probably use bananas that are completely brown as opposed to my spotted bananas, below.


3. In a medium bowl, whisk together the flour (measured, as always, with the spoon-and-sweep method), baking soda, salt and cinnamon. Set aside.

4. In the bowl of an electric mixer fitted with the whisk attachment, whisk the eggs and sugar on increasing speed until very light and frothy, about 10 minutes. You want your egg mixture to "ribbon" from the whisk as pictured below.


5. Reduce mixer speed to medium-low and slowly drizzle the oil into the egg mixture. When well-combined, stop the mixer and add the bananas, yogurt/creme fraiche/sour cream (if using) and vanilla. Whisk at medium-low speed to combine.

6. Turn the mixer off and add the flour mixture. Whisk at low speed until just combined. Do not overmix; your batter should be lumpy and there should be flour on the sides of the bowl.


7. Stop the mixer and, if using, add the walnuts. Gently fold the batter with a spatula, scraping the bottom and sides of the bowl, until the walnuts and flour are incorporated.


8. Pour the batter into prepared pan (I always use an 8 x 8 x 2 square pan, which bakes more evenly and solves the problem of dry, overbaked edges) and bake on the center oven rack for 45 to 55 minutes or until a toothpick or skewer inserted into the center comes out clean. (Check after 40 minutes.)


I find that this bread keeps in the refrigerator, tightly wrapped, for a week. It also freezes well. (Tip: Defrost at room temp, in the wrapping, so that the condensation collects on the outside of the wrapper and not on the bread. Because who likes soggy bread?)

Gesine Confectionary

I'm a big fan of people who leave well-paying yet unfulfilling corporate jobs to pursue their passions. So it's a no-brainer that I'm a fan of Gesine Bullock-Prado and her mail order bakery business, Gesine Confectionary. Her rustic macaroons are the bomb, and show up at your door in the most clever, beautiful packaging. And her book and blog are real treats (pun intended).


In mid-May, Gesine announced on her blog that she was reintroducing the porcelain mugs she used to sell in her brick-and-mortar bakery. All you had to do was place an order for macaroons, and she'd throw in a mug while supplies lasted. SOLD. I ordered my favorite flavor: lemon.


Gesine's macaroons are the real deal. They're handmade to order from almonds, egg whites, sugar, honey, salt and natural extracts. And they're divine. I popped three of the little buggers into my mouth before heading off to my Bar Method class. I had one of the best workouts I've had in a while.
 
Order some.