Tuesday, April 10, 2012

Irish Soda Bread Pancakes


Last month I set out to make Irish Soda Bread for St. Patrick's Day, like I always do. (I also made a Chocolate Stout Cake, but this blog has seen more than its fair share of cakes.) I was eager to try Fallon & Byrne's soda bread recipe touted in Bon Appetit, and in the course of looking up the recipe I stumbled across a fantastic idea: cooking the dough on a griddle, a la English muffins or crumpets. So I doubled the recipe and made both baked and griddled versions. Wouldn't you know it, the griddled bread was better than the loaf. Since then I've been playing with the recipe to make it a bit less dense while at the same time more oat-y. And pancake-y. And a touch savory, thanks to the addition of fresh rosemary.

The batter is hearty and nutty thanks to whole wheat graham flour, raw wheat germ and both old fashioned and steel cut oats.

It's also a touch sweet thanks to brown sugar.

Buttermilk imparts a slight tang -- and rise -- to the batter. 

You'll want to add the optional chopped fresh rosemary. Trust me. (This from a girl who isn't mad about rosemary.)

Drizzle the pancakes with honey or, better yet, Lyle's Golden Syrup.


Top with berries and you've got a winning breakfast that just so happens to be perfect pre-run fuel in case you, like me, are getting back into running.

Oh, and don't forget a generous pat of Kerrygold Pure Irish Butter.


Irish Soda Bread Pancakes
Makes 10, 4-inch pancakes


3/4 cup all purpose flour
1/2 cup whole wheat graham flour (or whole wheat pastry flour)
1/2 cup old fashioned oats
1/4 cup raw wheat germ
2 tablespoons steel-cut oats
2 tablespoons (packed) brown sugar
2 teaspoons baking soda
1/4 teaspoon kosher salt
1 tablespoon chopped fresh rosemary (optional)
2 cups buttermilk
Nonstick cooking spray

1. In a medium bowl, whisk together all of the ingredients except the buttermilk and cooking spray. Add the buttermilk and stir until the mixture forms a uniform batter.

2. Heat a griddle or cast iron skillet over medium-low heat. Coat with cooking spray and spoon about 1/4 cup of batter onto the griddle for each pancake. The batter is thick, so you'll have to press and spread it around with your finger or a spoon. Cook until golden brown, about 3-4 minutes, then flip and cook for another 3 minutes on the other side. Note: Between batches, wipe the griddle with a cloth or paper towel and re-spray with cooking spray.

Wednesday, February 15, 2012

Meyer Lemon Meringue Tartlets, South African Style

My latest baking endeavor began the way they often do -- with a challenge -- and played out in typical fashion: in fits and spurts of obsessive research and serious thought followed by compulsive ingredient gathering, fatigue and procrastination, and finally getting on with it (and making another trip to the market for fresh ingredients).

All of this is to say that I usually find the end result of all that activity to be disappointing, at least initially. I mean, it's difficult to do justice to the process. And while I do have my share of flops, more often than not I come around -- usually with feedback and encouragement from my supportive yet honest husband and friends -- and wind up quite pleased.

So yes, I'm pleased with these Meyer lemon meringue tartlets, which owe their existence to a South African friend and neighbor who issued the aforementioned challenge, informing me that American lemon meringue pie pales in comparison to the variety found in South Africa. I was unaware that there is any difference -- last year I'd sampled Tina Bester's version at her stall at the Biscuit Mill and didn't find it markedly different from what I was used to in the States -- but he explains that the version of which he is so fond owes its superiority to the meringue. French meringue to be exact, which is baked at a low temperature for several hours until completely dry. (Isn't this pie beginning to sound like the United Colors of Benetton of desserts?) 

The plot thickened when I consulted arguably the foremost authorities on South African cooking and baking, Ina Paarman and Tina Bester. The most marked difference between their recipes and, say, Alton Brown's (which is probably as typically American as you'll find), is not the meringue but the filling. Huh.

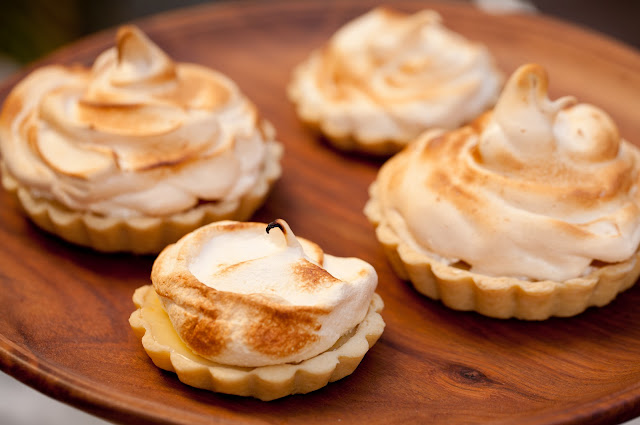
Rather than the lemon custard to which we're accustomed in the States, Paarman's and Bester's fillings are nothing more than sweetened condensed milk whisked with a couple of egg yolks, lemon juice and zest. In Paarman's recipe, the filling is par-baked in a cookie crust for 20 minutes before being topped with a simple unstabilized meringue, baked for another 25 minutes and left to cool in the oven for 1 1/2 hours. It's not completely dry like French meringue; rather, it's gooey inside and crunchy outside, like a browned marshmallow.

Bester's meringue isn't baked at all. In her version, egg whites are warmed with sugar, whipped into soft peaks and arranged on top of fully baked tartlets. In a final flourish, they're browned with a kitchen torch. As for Bester's crust, which she has aptly named "Well Behaved Pastry," it's a riff on Pâte Sucrée. With more than the usual quantity of sugar and two whole eggs, it's beautifully tender yet pops out of the tins without losing its shape. Best of all, it doesn't shrink when baked. Well behaved indeed.

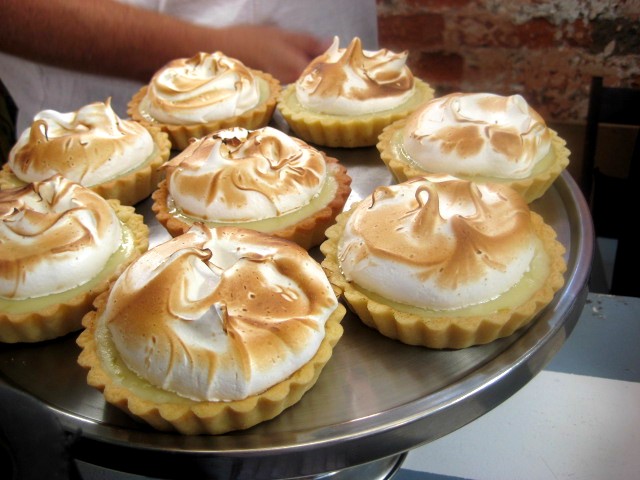
Tina Bester's lemon meringue tartlets at her Queen of Tarts stall at The Biscuit Mill.


I realize this much too much explanation for pie of all things, so I'll wrap this up by saying:
  1. I suspect there are regional variances in South African lemon meringue pie. Paarman and Bester are from the Western Cape, as is my husband, and they are all in agreement about soft meringue. That our neighbor is from Johannesburg and is partial to dry meringue leads me to believe it's native to that part of South Africa. (Readers, do you know if this is the case?)
  2. The filling in South African lemon meringue pies has a more subtle lemon flavor than American pies, and is creamier owing to the sweetened condensed milk. It's also easier to make because it doesn't have to be cooked into custard form before baking.
  3. To make my lemon meringue tartlets, I mixed and matched the portions of Paarman's and Bester's recipes that suited my preference for a Pâte Sucrée crust and my neighbor's penchant for French meringue. I'm mad about the resulting tartlets (the browned marshmallow topping is divine), but I didn't do right by my neighbor. The meringue isn't dry enough, so I've concluded that I'll have to bake the meringue separately and pop it onto the pie when the filling and still hot, so as to "glue" them together.
And that, my friends, is more than you'll ever care to know about lemon meringue pie.

It also seems I have a challenge to complete. If I disappear for a while, you'll know where to find me.


Meyer Lemon Meringue Tartlets
Makes about eight 6-inch tartlets, 15 3-inch tartlets or one 9- to 10-inch tart

The use of Meyer lemons isn't South African; I just happen to adore* them and they're abundant in markets right now. Their tangy-sweet flavor is perfectly suited to the milk-based filling.

*I used to pluck Meyer lemons from my great aunt and uncle's backyard tree and eat them like oranges all day long. Don't do that. You'll damage your tooth enamel.

For the crust (lightly adapted and converted from metric to standard from Bake: Tina Bester Queen of Tarts):
1 cup (2 sticks) unsalted butter, cold
2 cup granulated sugar
2 large eggs
4 cups flour
1/4 teaspoon salt
Note: This makes quite a bit of dough and you will have some left over. It makes lovely rolled and cut cookies, or you may freeze it, tightly wrapped, for up to one month. Also, I unintentionally made mine a bit more traditionally than Bester. Operating on autopilot, I separated the eggs and discarded the whites, and therefore had to add about 3 tablespoons of ice water at the end to bind the dough.

For the filling (lightly adapted and converted from metric to standard from Ina Paarman):
2 12-oz (395 g) cans sweetened condensed milk
1/2 cup boiling water
1 tablespoon lemon zest (from about 3 1/2 Meyer lemons)
1/2 cup freshly squeezed lemon juice (from about 4 Meyer lemons)
4 large egg yolks, room temperature
1/4 teaspoon salt

For the meringue (lightly adapted and converted from metric to standard from Bake: Tina Bester Queen of Tarts):
4 large egg whites
1 cup granulated sugar
1 teaspoon cornstarch

Make the crust:
1. In a food processor or stand mixer fitted with the paddle attachment, blend the butter and sugar until coarsely combined. Add the eggs, one at a time, followed by the flour and salt. Process or mix until a dough forms. Turn the dough out onto a sheet of plastic wrap, gather and press it into a disc, and refrigerate, tightly wrapped, for at least an hour or up to two days.

2. Heat oven to 350 degrees F. On a lightly floured surface, roll out the dough to 1/4-inch thickness. Place the tartlet tins upside down on the dough and cut circles about 1/2- to 1-inch larger than the tins all around. Turn the tins over and gently work the dough circles into them, making sure to press the dough into the edges and sides. Place on parchment-lined baking sheets and refrigerate for 30 minutes.

3. Blind bake the tartlet crusts (still on the baking sheets) for about 15 minutes or until they just begin to turn golden brown. (If making one large tart, the crust may need to bake for 5-10 minutes longer.) Remove from oven and reduce temperature to 325 degrees F.

Make the filling:
1. In a large bowl, whisk together the condensed milk (use the boiling water to get the last bit of milk from the cans), lemon zest, lemon juice, egg yolks and salt. Portion the filling into the prepared crusts (I use a liquid measuring cup for this), making sure it comes all the way to the top edges. Bake for 20 minutes while you make the meringue.

Make the meringue:
1. In a double boiler or medium saucepan set over the lowest flame, heat the egg whites and sugar, stirring constantly, until the mixture is just warm.

2. Transfer the warmed egg mixture to the (very clean and dry) bowl of a stand mixer fitted with the whisk attachment. Whisk on increasing speed (working up to high) until soft peaks form, about 8 minutes. Whisk in the cornstarch.

3. Remove the partially-baked tartlets from the oven. Pipe or spoon large dollops of the meringue on top of the hot filling. (If you have extra meringue, you can spoon dollops of it onto the parchment-lined baking sheets and bake along with the tartlets.) Bake for 25 minutes. (The meringue will be very slightly browned all over. If desired, remove the tartlets from the oven and brown the meringue with a kitchen torch, then return to the oven.) Turn off the oven and let the tartlets cool completely in the oven (about 3 hours). This gives the meringue a gooey, marshmallow center.

Tartlets may be stored in the refrigerator (the cool, dry air prevents the meringue from weeping) for up to two days.

Variation:
If you prefer a less marshmallow-like meringue and are okay with egg whites that aren't fully cooked, you may skip the step of baking the meringue. Increase baking time for filled tartlets to 45 minutes. Remove from oven and, while the filling is still hot, top with meringue and brown with a kitchen torch. Allow to cool completely before serving.

Thursday, February 09, 2012

Strawberries & Cream Heart Cookies


What's your stance on Valentine's Day? Love it? Hate it? My sentiments are somewhere in the middle. When I was in elementary school I loved addressing Valentines and making treats for class parties, but every year I was disappointed when I failed to receive a Valentine from the boy I had a crush on from kindergarten through eighth grade. (Such enduring, unrequited love. Also: awkward.) But for a "Hallmark holiday" I think it's a fine one. I am a hopeless romantic after all (see: childhood crush), and I can't fault a day devoted to the exchange of sweet treats and sentiments. Plus, it's a wonderful reason to get into the kitchen and bake something special for the ones I love. (And thankfully not for an elementary school party).

Strawberries & Cream Hearts
Makes about 18 2-inch cookies

These Strawberries & Cream Sandwich cookies are a nod to my husband's favorite South African biscuit, Bakers Strawberry Whirls. Strawberry Whirls are not readily available in the United States, and the last time we got our hands on them (thanks, Rose!), my husband was saddened to find that the manufacturer had changed the recipe. What was once a beloved tea time treat is now a chalky biscuit whose cream and strawberry filling leaves an unpleasant chemical aftertaste. So I did what any self-respecting baking enthusiast (and perfect wife, ha ha) would do: I came up with a homemade version.

Because I don't have a press or mold for making cookies with a swirl pattern like actual Strawberry Whirls, I opted for a rolled and cut cookie. The result is a sort of hybrid between Strawberry Whirls and another iconic Bakers treat, Jolly Jammers. I cut hearts in the tops for Valentine's Day, but you could cut out a small round a la Strawberry Whirls, a silly face like Jolly Jammers, or any shape you like.

No matter what you call them -- Strawberry Whirls, Jolly Jammers or Strawberries & Cream Hearts -- these cookies are light and delicious, with no chemicals or strange aftertaste. The dough is fantastic in that it can be re-rolled and cut several times without losing its light, flaky texture, and holds its shape when baked.

For the dough:
14 tablespoons (1 and 3/4 sticks) unsalted butter, at room temperature
1 cup confectioners' sugar
2 large egg yolks, at room temperature
1 teaspoon vanilla extract or vanilla bean paste
1 cup cake flour, measured using the spoon and level method
1 cup + 2 tablespoons all purpose flour, measured using the spoon and level method

For the filling:
4 tablespoons (1/2 stick) unsalted butter, at room temperature
4 tablespoons (1/4 cup) vegetable shortening
2 cups confectioners' sugar, sifted before measuring
2 teaspoons vanilla extract or vanilla bean paste
Strawberry jam

1. In a In the bowl of a stand mixer fitted with the paddle attachment, beat the butter, confectioners' sugar and egg yolks until light and creamy, about 3 minutes. Add the vanilla and beat until incorporated.

2. In a medium bowl, whisk together the flours. Add to the butter mixture and beat until combined, about 30 seconds. Scrape the dough from the mixer bowl onto a piece of plastic wrap and form into a disc. Wrap tightly and chill in the refrigerator for at least an hour and up to two days. (The dough may be frozen for up to a month. Defrost in the plastic wrap to allow condensation to collect on the plastic and not the dough.)

3. When you're ready to bake the cookies, heat the oven to 325 degrees F. Remove the dough from the plastic wrap and roll out on a lightly floured surface to a scant 1/4 inch thickness. Cut cookies with a 2-inch round biscuit or cookie cutter. Use a heart-shaped mini cutter to cut hearts out of half the cookie rounds.

4. Transfer cookies to a parchment- or silicone-lined baking sheet and bake for 15 to 20 minutes or until lightly golden, rotating the sheets halfway through baking. Allow to cool completely before filling and assembling.

5. To make the cream filling, beat together the butter, shortening, sugar and vanilla until light and fluffy, about 3 minutes.

6. To assemble the cookies, use an offset spatula to spread the cream filling on the underside of the cookies that don't have hearts cut out of them.  The cream filling should be about 1/4 inch thick and not quite reach the edges of the cookies. Top each cookie with a layer of strawberry jam and a heart cutout cookie.

Friday, February 03, 2012

Crostini

I could go on and on about how much I love having pre-roasted ingredients on hand for assembling meals and snacks, but I'll get right to the point: paired with a handful of store bought ingredients, roasted vegetables and fruit make perfect toppings for a seemingly endless variety of crostini that can be assembled in five minutes flat. So the next time you're in need of a little lunch, a snack or even an appetizer for a gathering, these little toasts are just the thing. Below are a few of my recent favorites. Please ignore the color (and other) problems with the photos, and have a happy weekend!

Herbed Goat Cheese, Marinated Beets and Toasted Almonds
Chunks of roasted red beets are marinated in champagne shallot walnut vinaigrette and spooned onto toasted ciabatta bread that's been slathered with herbed chèvre. Finish with chopped toasted almonds, a drizzle of olive oil, and salt and pepper.

To make the beets: Scrub and dry whole red beets, rub with olive oil and wrap in aluminum foil. Place on a baking sheet and roast in a 400 degree F oven for about 45 minutes, or until tender when pierced with a fork. When cool enough to handle but still warm, peel and chop the beets into chunks. Toss with vinaigrette of choice (I make my own or use Stonewell Kitchen's Champagne Shallot Walnut Dressing) and refrigerate for at least an hour.

Ricotta, Roasted Pear and Golden Syrup
Remember those pears from the Roasted Pork Tenderloin with Pears and Leeks? They're delicious atop ricotta on toasted ciabatta. Drizzle with Lyle's Golden Syrup (or agave or honey) and sprinkle with freshly ground black pepper for a punch of flavor. 

Nutella and Roasted Banana
For a rustic, deconstructed twist on pain au chocolat, slather (yes, slather) Nutella (or your favorite chocolate and nut spread) on toasted ciabatta and top with sliced oven- or pan-roasted bananas. A sprinkle of powdered sugar and an extra spoonful of Nutella on the side make for a whimsical presentation.

Thursday, February 02, 2012

Roast Pork Tenderloin with Pears and Leeks


So far 2012 has been all about simplifying and refocusing. As 2011 came to a close and I reflected on the year that had passed, I realized the extent to which I let myself get sidetracked by concerns that don't ultimately matter. So I'm shifting my focus back to what's most important and real: family, friends, my dogs, work (in no particular order). I've not been on blogs or Twitter or Facebook much (although I am publishing links to this post on the latter two sites), and my Instagram posts are few and far between.

Among the many wonderful results of this social media greyout is that I'm not looking at my phone and its addictive social media apps every minute or two, and I'm freeing myself from some of the associated pitfalls that so easily erode happiness, such as Fear Of Missing Out and The Comparison Trap. I feel clearer, lighter and more content.

Something else that has me contented is spending Sunday afternoons in the kitchen preparing simple, comforting meals to reheat during the week. Roasting has been my cooking method of choice, and dishes such as crispy skinned buttermilk brined chicken, roasted smashed potatoes and pork tenderloin have been just the thing to enjoy at the end of long and busy days.

Roast Pork Tenderloin with Pears and Leeks
Makes 8 to 10 servings

This recipe was passed on to me by a dear friend who is an expert at treating family and friends to fantastic, healthy meals with minimal fuss. This dish is perfectly suited to a Dutch or French oven, but a large cast iron skillet or rimmed baking sheet will do just fine. (If using the latter, brown the tenderloin in a large pan on the stove before transfering it to the baking sheet.) I deviated from the recipe a bit in that I brined my pork tenderloin for 24 hours before roasting it. If I have the time I always brine pork and poultry. If you're new to brining, Cook's Illustrated's method is foolproof.
Ingredients:
1 boneless pork loin roast, about 3.5 pounds, excess fat and silverskin removed 
Kosher salt and freshly ground pepper, to taste
2 Tablespoons olive oil
5 ripe red Anjou pears, or 4 large or 6 small apples, halved lengthwise and seeds removed
4 leeks, white portions only, trimmed, halved lengthwise and rinsed

Directions:
1. Position a rack in the lower third of an oven and preheat to 400°F. Season the roast liberally with salt and pepper. (Tie the roast with kitchen twine if it comes halved lengthwise.)

2. In a 5 1/2-quart (or larger) Dutch oven over medium-high heat, warm the olive oil. Add the pears or apples, cut side down, and cook until browned, about 5 minutes. Transfer to a plate.

3. Add the pork to the pot and brown on all sides, about 8 minutes total. Transfer to a plate.

4. Place the leeks, cut side down, in the pot in a single layer. Set the pork on top of the leeks and place the pears or apples along the sides of the pot, encircling the roast.

5. Roast until an instant-read thermometer inserted into the center of the pork registers 140°F, 45 to 55 minutes.

6. Transfer the pork to a carving board, cover loosely with aluminum foil and let rest for 10 minutes before carving. Transfer the leeks and pears or apples to a platter. Cut the pork into slices and arrange on the platter.