Tuesday, February 22, 2011

Chocolate Chunk Cookies


This weekend I made the best chocolate chunk cookies. I can't promise they're the best chocolate chunk cookies you'll ever make, nor can I take any credit for the recipe. I adapted it from from Dawn Finicane over at vanilla sugar; Dawn has a self-proclaimed obsession with recreating Levain Bakery's cookies. I can't say if these taste like Levain's or not because, sadly, I haven't yet had the pleasure of having my mind blown at Levain.

I left the ingredients and quantities in Dawn's recipe mostly unchanged (I increased the salt, baking powder and vanilla, and didn't use European butter), but employed a slightly different technique. Rather than shred cold butter with a cheese grater as Dawn instructs (too messy/melty), I cut the butter into 1/2-inch chunks and pulsed it in my food processor with the sugar. The key here is to create a dough that's studded with pieces of cold butter, a la biscuits or scones, as opposed to creaming the butter as you would when making most cookies.

Also key is letting this dough rest in the refrigerator for at least 4 hours and preferably overnight. I've told you before and I'm telling you again: do not underestimate the importance of letting the dough rest and absorb moisture and flavor from the fats and liquids.

Best Ever Chocolate Chunk Cookies
Makes about 20 to 24
Adapted from Dawn Finicane's Levain Bakery chocolate chip cookie clone recipe at vanilla sugar, which itself is inspired by Levain Bakery and cookiemadness.net. (All of which is beginning to remind me of the episode of Friends in which Phoebe realizes her grandmother's legacy -- her super secret recipe for the best chocolate chip cookies ever -- is really the Nestle Toll House recipe.)

3 cups unbleached all purpose flour, measured using the scoop and sweep method
1 to 1 1/4 teaspoons sea salt (I recommend you use flake sea salt as opposed to coarse crystals)
1 1/2 teaspoons baking powder
1/2 teaspoon baking soda
1 cup (2 sticks) cold unsalted butter, cut into 1/2-inch cubes (European butter is recommended for its low moisture content, but if you can't find it, use a quality brand. Avoid store brands, as they contain too much water.)
3/4 cup granulated sugar
3/4 cup brown sugar, tightly packed
2 large eggs, cold
2 teaspoons vanilla
2 cups best quality semi-sweet chocolate chunks or chips (I used Valrhona 70% Guanaja, which I buy in 3 kg blocks. If you prefer a sweeter cookie, use chocolate with more sugar, e.g., 60% cocoa solids.)
1 heaping cup walnut halves, roughly chopped

1. In a medium bowl, whisk together the flour, salt, baking powder and baking soda. Set aside.

2. In the bowl of a food processor or stand mixer fitted with the paddle attachment, process or beat the butter with the sugars just until lumps of butter the size of large peas are incorporated throughout the sugar. If using a food processor, transfer the butter-sugar mixture to the bowl of a stand mixer fitted with the paddle attachment.

3. Add the eggs and vanilla and beat on low speed just until combined; lumps of butter should remain. Add the flour mixture, chocolate and walnuts all at once, and beat on increasing speed until you're certain you're on the verge of burning up your mixer's motor. Remove the bowl from the mixer, set aside the paddle attachment, and gently work and fold the dough with your hands until the flour, chocolate and walnuts are evenly distributed.

4. Using a 1/4 cup measure and your hands, shape the dough into (approximately) 2-ounce balls. Work quickly; the butter should remain in cold pieces as opposed to warming enough to "melt" into the dough. Place the balls on a cookie sheet, plate or similar. Cover tightly and refrigerate for at least 4 hours or overnight.

5. When you're ready to bake the cookies (i.e., the dough has rested sufficiently), heat oven to 375 degrees F. Place the dough balls on parchment- or silicone mat-lined baking sheets, spacing them about 4 inches from the edges and each other. (I fit exactly 7 cookies on each of three, 13" x 18" half sheet jelly roll pans.) Do not flatten the dough balls.

6. Bake cookies at 375 for 8 minutes, then reduce the oven temperature to 325 degrees F, rotate the baking sheets 180 degrees and bake for another 8 to 10 minutes or until cookies appear set and are golden at the edges. Remove cookies from oven (still on the baking sheets) and cool on baking racks for 2-5 minutes, then move cookies directly onto racks to cool completely. (I simply slide the cookies -- still on the parchment paper -- from the baking sheets to the cooling racks.) Cookies will keep in an airtight container at room temperature for two days or in the freezer for a month.

I found the flavor of these cookies to be even better the second day. I recommend you break them into chunks, slather them with peanut butter and shove them in your face. I'm not even kidding.


Update 3/10/11: I've since made several more batches of these cookies, and have found that increasing the sea salt to 1 1/4 teaspoons makes these cookies amazing. Also, because the dough is not very sweet, I now prefer to use semi sweet chocolate chunks that are 55% to 60% cocoa solids.

Thursday, February 10, 2011

Alice Medrich's Cocoa Brownies with Browned Butter and Walnuts


Once upon a time when I was in college, I had the privilege of working at Cocolat, Alice Medrich's famed Northern California chocolate dessert shop. Although Alice had sold her share in the company by the time I joined, she was still present in the simple yet decadent confections that filled the pastry cases each day. Her brilliance with all things chocolate made her a superhero to me, and any time she popped in to the shop -- in the flesh! -- to pick up a torte or truffles, I'd go weak in the knees.

In the years since, I've made many of Alice's creations at home using recipes from her beautiful books. Of course they're never quite the same as the treats from my Cocolat days, but they never disappoint. So when this month's Bon Appetit magazine arrived with a stash of new cocoa-based recipes from Alice, I knew exactly what to do: whip up a batch of her Cocoa Brownies with Browned Butter and Walnuts. Immediately. Bon Appetit's editors describe these as "some of the best brownies we've ever had." Of course they are!

If you're tempted to tweak and doctor Alice's deceptively simple recipe, don't. She knows what she's doing, and her brownies are perfect as-is -- even if, like me, you don't usually care for walnuts in your brownies. The nuttiness of the brown butter is enhanced by the walnuts, which themselves make for a satisfyingly toothsome bite.

But if you absolutely insist on making another batch with globs of Nutella swirled on top, I won't stop you. Either way, they make a perfect Valentine's Day treat.


Wednesday, February 09, 2011

The Old Biscuit Mill

One of my favorite things to do in Cape Town is visit the Saturday morning Design Goods and Neighbour Goods Markets at The Old Biscuit Mill. A former, uh,  biscuit (cookie) mill built in the late 1800s, the village-like complex now houses shops, galleries, farm stalls and cafes, as well as day and night markets, festivals and events. It's a must. (As is a visit to the Mill's website, which does a much better job than I of explaining it.)

The key to the Saturday markets is to arrive early. They officially open at 9 a.m., but it's best to get there as early as 8; the purveyors will still be setting up their stalls, but by 9:30 it's a mad house through which you can barely move, let alone get a decent photo -- or the pastry you've been coveting since you arrived.

And now I'm going to positively bomb this post* with photos because talk is cheap, a photo is worth a thousand words, and you're only here for the photos, right? 

*I know: I need to build galleries for photo heavy posts. Someday...

The Design Goods Market
Here you'll find designers selling clothing, accessories and toys for children, animals and the young at heart. My favorite stall is Petite Pois, where spunky children's clothes are sold out of a customized 1970s Mini. I couldn't resist getting a Rainbow Brite-ish outfit (top left corner of the photo below) for my friends Jake and Reagan's daughter, Piper. You can see Piper rocking the outfit -- and some other stuff I picked up for her -- here. (And, as Reagan would say, don't be jeal'!)


I really, really, really wanted one of these dolls, but I just couldn't justify it.


 Nor could I justify hauling this tipi back to America. (Sniffle.)


The Neighbour Goods Market
Words can't describe the awesomeness of the food and drink you'll find under the two giant tents at the Neighbour Goods Market. I've been stuck for hours trying to write something to do it justice, so I'll just tell you to bring your appetite and a big bag for hauling your goods home -- if they make it that far.

Something you don't need to bring, however, is a lot of cash. I'm making a huge generalization here, but compared to America, quality food is more affordable in South Africa, and not just because of the favorable exchange rate. Similar to what I observed in Europe, in South Africa fresh, local, organic, expertly crafted food isn't the luxury it is here.

Communal tables made from old doors.
I fell in love with the funky old striped refrigerator in the background on the left.


Bread, glorious bread.

A hummus platter bigger than my head.

The biggest spring rolls I've ever seen (about 3x5 inches each).

Veggie struuuuuuuudel.

Whipping up fresh Hollandaise for rosti Benedict.


With an exchange rate of about 7 South African rand to one U.S. dollar, these pies are about $3.50.
Veggie curry wraps.

Mushroom skewers at the Funky Fungi stall.
I loved the Bay Kebab stall because my maiden name is from the Dutch word, schoner.
The Bay Kebab truck. Brilliant.


$3!

Beer at 9 a.m.?
I prefer coffee.

Savory tarts.

Sweet tarts.

Apple galettes.

Giant apple strudel (about $2.50).


Carrot cake muffins with lime icing at Tina Bester's Queen of Tarts stall.

Lemon meringue tartlets at Queen of Tarts.

Milk tart (melktert). Very South African, very delicious.
"Really brilliant biscuits" at Dunk.


Artistry at Martin Senekal Confectionery Design. The sweet potato peanut cake was mind blowing.

Well, friends, that's about all the photos this little blog can handle. Thanks for scrolling -- I hope it didn't give you a finger cramp.

Friday, December 24, 2010

Sweet Homemade Gifts

Guys, I'm kind of in denial about Christmas. It's always a bittersweet time for me, and this year is especially difficult. I'm just not feeling it. But last night I managed to muster enough Christimas spirit to bake and package homemade gifts for some of our co-workers and friends.
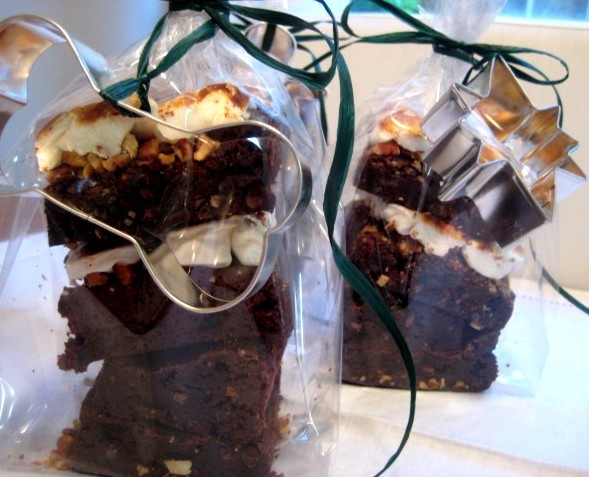
I made a big batch of Barefoot Contessa's Outrageous Chocolate Brownies, which I doctored with 2 tablespoons of Knob Creek Kentucky Straight Bourbon. (Only the best for the best.) I topped half the batch with candied pecans and marshmallows, and broiled the mess until it was perfectly melty and toasty. (By the way, the marshmallows are from Chicago Soydairy and are the best ever. Plus, they're vegan, i.e., they contain no animal gelatin, which is grosssss.)

I also made three batches of peanut butter cookies (classic, chocolate chunk and peanut butter cup) and several mini loaves of pumpkin bread. I packaged everything in clear cello bags adorned with cookie cutters and green raffia ribbon. The gifts couldn't have been easier or more economical to make, and it felt great to see the smiles -- and chocolate -- on the recipients' faces. Aren't homemade gifts the best?


I also managed to bake a Christmas turd.


Merry Christmas to you and yours!

Tuesday, December 21, 2010

Dairy- and Gluten-Free Eggnog "Cheesecake" Squares

In light of yesterday's post about the evils of flour and sugar -- the hilarity of which I hope wasn't lost on you -- today's post about Eggnog "Cheesecake" Squares is nothing if not ironic. Yes, folks, it's another dessert recipe. And it's probably the most processed thing I've ever made, thanks to the use of gluten-free graham crackers and dairy-free cream "cheese". (The latter tastes and smells so chemical, I nearly gagged. Thankfully this goes away upon baking.)

But 'tis the season for giving -- and indulging -- so this post is a holiday gift to some of my favorite bloggers-slash-readers who avoid gluten and/or dairy. Lindsay, Katie and Stew, this one's for you. (And your friends and family, who won't have a clue these treats are dairy- and gluten-free.) Enjoy!

Note: These squares aren't vegan because they rely on eggs -- particularly yolks -- as a binder, but I have faith Katie can veganize them. Or Angela, who could add some of her homemade Vegan Nog. Yum.)


Eggnog "Cheesecake" Squares (Dairy- and Gluten-Free)
Makes 16 to 24 squares, depending on cut size
Adapted from Elizabeth's Eggnog Cheesecake Bars at MarthaStewart.com*

8 ounces gluten-free graham style crackers (I used Kinnikinnick Foods S'moreables), crushed or processed into fine crumbs
4 tablespoons Earth Balance Buttery Spread, melted
3 tablespoons plus 3/4 cup sugar
1 lb (two 8-oz tubs) non-dairy cream cheese substitute (I used one tub of Tofutti Better Than Cream Cheese and one tub of Follow Your Heart Cream Cheese Alternative. I have no idea why.)
2 large whole eggs
1 large egg yolk
1 tablespoon brandy (optional)
1 tablespoon pure maple syrup
1 teaspoon pure vanilla extract or vanilla bean paste (I used paste)
1 tablespoon certified gluten-free oat flour*
1 teaspoon cornstarch*
1 teaspoon ground nutmeg
Pinch salt
Vegetable oil cooking spray

1. Heat oven to 350 degrees F and coat a 9-inch square cake pan* with cooking spray. In a medium bowl, combine the graham cracker crumbs, melted Earth Balance and 3 tablespoons sugar. Press into bottom of pan and bake for 12 minutes, rotating pan halfway through. Set on wire rack to cool.

2. Meanwhile, in the bowl of an electric mixer fitted with the paddle attachment (you could easily mix this by hand), beat the cream cheese substitute on medium speed with the eggs, egg yolk, brandy, maple syrup, vanilla, 3/4 cup sugar, oat flour, cornstarch, nutmeg and salt until thoroughly combined and smooth. Pour filling over crust.

3. Bake on middle oven rack until filling is set, rotating pan halfway through, about 40 to 45 minutes. (This took exactly 40 minutes for me, and the filling puffed up like a souffle. However it deflated and became perfectly flat and smooth as it cooled.) Cool on a wire rack for about an hour, then cover and chill for at least 3 hours or up to 1 day.

4. Cut into bars and serve.

*Notes:

- You may remember my November announcement that I wanted to recreate my mom's tofu cheesecake for Thanksgiving, and that it was a flop which went missing from my holiday table. Then I bought the Martha Stewart Holiday Cookies magazine, fell in love with the Eggnog Cheesecake Bars (which have made the rounds on some blogs), and thought maaaaaybe I could take a traditional cheesecake recipe and make it dairy- and gluten-free. Bingo! These babies are outstanding and taste exactly like traditional cheesecake.

- I wasn't mad about the idea of using a 9" square cake pan because I could foresee disaster when trying to cut and remove the squares from the pan. I was right -- I mangled about half the squares. So I would recommend using a springform or tart pan with removable sides.

- If you don't have or don't like oat flour, omit it and increase the cornstarch to 1 1/2 teaspoons.

- I bought Silk Nog with the intention of using it in place of the 3/4 cup of dairy eggnog in the Martha Stewart recipe, but when I poured it from the carton I realized it was too watery. I tried cooking it down to the thickness of traditional eggnog, but to no avail. So I ditched it. To compensate, I doubled the nutmeg and added 1 tablespoon maple syrup.

- The Martha Stewart recipe calls for baking the pan of cheesecake squares in a water bath, but I didn't think it was necessary. I was right.

P.S. I know, I know -- more wretched photos. It's still raining, which means no light or outdoor shoots. Hastily "styling" and photographing these babies before rushing out the door to work doesn't help either. Especially when a restless puppy is gnawing on my ankles.

Monday, December 20, 2010

Easy White Bean, Swiss Chard and Butternut Squash Soup

It's been raining for days here in Southern California, which means two things:*

1. Soup; and
2. Wretched photos, thanks to zero light.

There's no end in sight to the rain, so before we wash away into the ocean I'll share my recipe for Easy White Bean, Swiss Chard and Butternut Squash Soup.

It's vegan. It's delicious. It's carnivorous-husband-approved.

If only it could make the rain stop.


White Bean, Swiss Chard and Butternut Squash Soup
Makes about 12 cups

1 1/2 tablespoons olive oil
1 medium white onion, finely chopped
3 stalks celery, finely chopped
3 medium carrots, peeled and finely chopped
Sea or kosher salt
4 cups vegetable stock
6 cups water
1 medium butternut squash, peeled, seeded and cut into 1/2 inch cubes (about 4 cups)
2 dried bay leaves
1 bunch Swiss chard, leaves only, loosely chopped (about 6 cups)
1 15-ounce can cooked white beans (such as Great Northern), drained and rinsed
Freshly cracked black pepper

1. In a large soup pot set over a medium flame, heat the olive oil. Add onions, celery and carrots and saute for about 5 minutes, until vegetables begin to release their juices. Sprinkle with about 1/2 teaspoon salt and saute for about 5 minutes more, until onions are transluscent.

2. Add the vegetable stock, water, butternut squash and bay leaves. Bring to a boil, reduce heat to simmer, and cook for about 10-15 minutes, until squash begins to soften. Add the Swiss chard and beans and simmer for about 5 minutes more. Season to taste with salt and pepper and serve.

*Days of nonstop rain also mean:

Stir crazy dogs;
A stir crazier puppy;
A puppy who dislikes pottying in the rain so much, she relieves herself on the door mat;
Frayed nerves on the part of The Headless Hound and us humans; and
A frantic, late-night plea to our dog trainer for help with puppy's incessant I'm-so-bored-I-could-bark-until-you-lose-your-hearing barking.

Please send help.

Saturday, December 18, 2010

Mary's Currant Scones


In the past I've written about my mom's scones and how she'd bake them on Sundays while my dad spun reggae records on the living room turntable. It's one of my most treasured childhood memories and a tradition I hope to continue with my own children someday. (Though I suppose Laird and I will have to sort out whether we'll make Nana's or my mom's scones. Maybe we'll alternate?)

Light, buttery and studded with Zante currants, mom's scones weren't the dry, heavy sugar bombs you find these days at Starbucks. I've encountered scones like hers only once: at afternoon tea on The Veranda at the Moana Surfrider Waikiki. I enjoyed them so much, the hotel sent me home with a little box of them (but not the recipe). 

I don't have my mom's recipe, either, but with some experimentation I've come up with a close approximation. They're not quite the same, but if I put on some reggae, I can almost imagine she's here with me.

Mary's Currant Scones
Makes about 8

As with any scone or biscuit, the key here is to use a very light touch. Mix the ingredients and handle the dough as little as possible.

3 cups unbleached all-purpose flour
2 tablespoons sugar, plus more for sanding
1 teaspoon kosher or sea salt
3 tablespoons baking powder
3/4 cup Zante currants (Use raisins if you can't find Zante currants, but avoid the more widely available golden currants.)
6 tablespoons unsalted butter, very cold, cut into 1/4-inch pieces
1 1/4 cups whole milk, very cold
Half and half OR 1 egg yolk, whisked

1. Heat oven to 375 degrees F and line a baking sheet with parchment.

2. In a medium bowl, whisk together the flour, 2 tablespoons sugar, salt and baking powder. Add the currants and toss to coat with the flour mixture. Rub in the cold butter with your fingertips, working quickly so as not to warm the butter. The mixture should resemble very coarse cornmeal with large pea sized lumps of butter throughout. Add the milk all at once and gently stir until the dough just begins to come together. Turn it a few times in the bowl to pick up the dry flour bits at the bottom.

3. Transfer the dough to the prepared baking sheet and quickly shape it into a rectangle about 1 1/4 inch thick. Cut the rectangle on the diagonal to form 8 wedges (see below). Brush with half and half or whisked egg yolk, and sprinkle with sugar. 


4.  Bake for 18-25 minutes, rotating pan halfway through, until scones are golden brown on top and sound hollow when tapped. Cool on a rack for 5 minutes, break into wedges, and serve with butter and jam.

Scones are best served warm, on the day they're made. However, I've had success freezing and then reheating them in a 350 degree F oven.


Friday, December 17, 2010

Roasted Brussels Sprouts with Bacon Cider Vinaigrette


Say the words, "Brussels sprouts" to most people, and they gag at the mere thought. At this very moment you're probably remembering a scene from your childhood: sitting at the dinner table well after the rest of the family was excused, held hostage by a plate of boiled Brussels sprouts your parents insisted you eat just one of before you could rejoin humanity.

Shame on all those parents who boiled Brussels sprouts into soggy, bitter oblivion. Because, when prepared properly, they're divine. (As are broccoli, cauliflower, mushrooms, asparagus, and so many other vegetables to which people are averse.)

So... How does one prepare them properly? Toss them in olive oil, roast them until they're soft on the inside and caramelized on the outside, and generously season them with salt and pepper. (I like mine with lots of sea salt, a la French fries.)

And those of you not averse to meat should flavor them with a simple vinaigrette of cider vinegar and lots of crispy bacon -- but only if it's certified humane and all natural.

Roasted Brussels Sprouts with Bacon Cider Vinaigrette
Makes 6 to 8 servings (recipe can be halved or multiplied)

For the roasted Brussels sprouts:
2 lbs whole Brussels sprouts, washed and trimmed of any tough or brown outer leaves
2 tablespoons extra virgin olive oil (I prefer a good quality oil with intense fruity and peppery flavors)
Sea or kosher salt
Freshly ground black pepper

For the bacon cider vinaigrette (optional):
1/2 to 3/4 lb bacon, cut into 1/2-inch pieces
1 tablespoon apple cider vinegar

1. Heat oven to 375 degrees F and line a baking sheet (or two, depending on size) with parchment paper or aluminum foil. Trim any browned ends off the sprouts, then slice them in half.


2. Arrange the sprouts on baking sheet(s), drizzle with olive oil and toss to coat.


3. Roast for 35 to 45 minutes, stirring and tossing them around halfway through, until sprouts are softened on the inside and crispy on the outside. Remove from oven, season to taste with salt and pepper, and serve.


To make the Bacon Cider Vinaigrette, cut 1/2 lb to 3/4 lb pound of bacon into 1/2-inch pieces. Saute in a heavy-bottomed skillet or pan until brown and crispy. Carefully drain the fat from the pan (I do this several times while the bacon cooks), leaving about 3/4 tablespoon bacon fat. Add the roasted Brussels sprouts and apple cider vinegar, toss to combine, and serve.

Monday, December 13, 2010

Caramelized Stuffed French Toast CHALLAnge


Once upon a time my friends Jake and Reagan went to Philadelphia to run a half marathon. But before they got to racing, they got to eating -- my kind of people. On the pre-race menu: Stuffed Caramelized Challah French Toast at Sabrina's Cafe. And then they (quite sportingly) CHALLAnged me to recreate it. (Reagan came up with the awesome name.)

It was a long time coming, but yesterday I finally got it together and threw down for the challenge. I honestly had no idea what I was doing -- I haven't tasted Sabrina's French toast, nor any other stuffed French toast -- but Reagan was kind enough to give me a hint: the cream cheese was whipped and flavored with cinnamon. The rest was just a matter of mixing up some ingredients I thought went well together.

I flavored reduced fat whipped cream cheese with maple syrup, cinnamon and orange zest, and spiked the egg custard with the same, plus nutmeg.

Although challah is braided, I was only able to find a traditional loaf shape.
And I see now that I should have made Mickey Mouse French toast.


How did it turn out? In a word: perfect.

This would be just the thing to whip up for house guests or a special occasion. The effort and time involved (about 20 minutes start to finish) are deceptively minimal for such an impressive result. Everyone will think you slaved over it, to which you can honestly respond: it was no trouble at all.
Caramelized Stuffed Challah French Toast
Serves two (recipe can be multiplied)

For the cream cheese filling:
1/4 cup cream cheese (I used a reduced fat whipped variety, which was too salty for my taste. I suggest you go with full fat Philadelphia cream cheese which is more creamy and less salty.)
2 tablespoons pure maple syrup (Laird didn't think the cream cheese filling was sweet enough, so you might consider increasing the maple syrup or adding honey or sugar.)
1 teaspoon orange zest
1/2 teaspoon ground cinnamon

For the toast:
Four slices challah bread, sliced one inch thick (You could substitute another rich bread such as brioche loaf.)
2 large eggs
1/2 cup whole milk
1/4 cup pure maple syrup
1/2 teaspoon pure vanilla extract
1 teaspoon orange zest
1/2 teaspoon ground cinnamon
1/4 teaspoon ground nutmeg

For serving:
One banana, sliced
Pure maple syrup
Powdered sugar

1. In a small bowl, stir together the cream cheese filling ingredients until thoroughly combined. Spread a generous tablespoon (each) on two pieces of bread. Spread the filling to about 1/2-inch from the crusts so that it doesn't ooze out the sides during cooking. Place the plain bread slices on top of the slices with cream cheese filling, sandwich-like.

2. In a medium bowl, whisk together the eggs, milk, maple syrup, vanilla, orange zest, cinnamon and nutmeg. Transfer the mixture to a shallow baking dish and place one cream cheese "sandwich" in the mixture. Press down gently to ensure it absorbs lots of custard. Turn over and repeat on the other side.

3. Meanwhile, lightly coat a griddle or skillet with cooking spray and heat it to medium. Transfer the custard-soaked "sandwich" to the griddle and cook for about 3-5 minutes on each side, until brown and caramelized. Slice in half and arrange on a plate with sliced bananas. Drizzle generously with pure maple syrup, dust with powdered sugar, and serve. Repeat steps 2 and 3 with remaining "sandwich."

Jake and Reag, it was super fun cooking for you.