Monday, September 20, 2010

Sourdough Soft Pretzels


As I alluded to in my previous post about sourdough English muffins, when I was growing up I was tight with my maternal grandparents. Actually, I was (am) tight with all of my mom's relatives. An only child, mom hails from a small but close-knit clan (yes, clan) whose origins have been traced all the way to fourteenth-century Scotland by my genealogy-loving family. But I digress.

The point I'm laboring at has to do with the regular treks we'd make every summer from our farm in the mountains to my grandparents' home in the Berkeley Hills. We'd spend a month or so with them, familying it up around the Bay Area, watching television and eating "regular" food slipped to us kids by my grandmother. Although I was in awe of television (we didn't have one at home) and besotted with the Hershey's bars my grandfather bought for me at the ninth hole snack bar when I accompanied him to his regular Saturday golf games, my favorite treats were sourdough soft pretzels from the carts which dotted San Francisco's financial district.

Once a week or so, I'd accompany my mom on an errand to the City, during which we'd stop by my grandfather's office on Kearny Street. In exchange for quietly banging on typewriters and scribbling on my grandfather's stationery while the adults talked, I was treated to a pretzel from a cart on Market Street to eat on the BART ride back to Berkeley.

There's really nothing better than a piping hot sourdough pretzel -- salty and crusty on the outside, soft and tangy on the inside. (That's what she said? Sorry. It's reflexive.) I'm fairly certain there's a gene for loving salt and bread, and that I have it. I've searched high and low for pretzels like those from my childhood, but nothing has ever come close. I've tried to order them from reputed bakeries in Philadelphia (unfortunately one can only buy them frozen and in bulk), and I fall for the monstrosities at the pretzel carts in New York City every time. I know from sight alone that they're awful, but I secretly hope that by sheer will, I can conjure them to be like those from my childhood.

It turns out I can conjure the pretzels from my childhood, in my very own kitchen. Or pretty darn close, anyway. Who says time travel isn't possible, or that baking isn't magical...?


Sourdough Soft Pretzels
Makes about 16 full-size or 32 miniature pretzels

2 tablespoons unsalted butter
1 tablespoon + 2 tablespoons sugar
1 cup hot (but not boiling) water
1 1/2 cups sourdough starter
2 teaspoons kosher salt
3 cups all purpose flour
2 1/2 cups bread flour
1/4 cup baking soda
1 egg
Sea or kosher salt, for sprinkling

1. In the bowl of an electric mixer fitted with the paddle attachment, dissolve the butter and 1 tablespoon sugar in the hot water. Add the sourdough starter and stir to combine. Add 3 cups all purpose flour and mix on low speed until the flour is incorporated. Stop the mixer and swap out the paddle attachment for the dough hook.

2. Add 2 1/2 cups bread flour and mix on low speed until the dough pulls away from the sides of the bowl and becomes elastic, about 2 to 3 minutes. Transfer the dough to a large oil-coated bowl. Lightly coat the top and sides of the dough with oil, cover the bowl and set in a warm place two hours or until the dough has doubled in size.

3. Punch down dough to remove bubbles and transfer to a lightly floured board. Knead a couple of times, then divide into 16 pieces (or 32 if miniature pretzels). [I cut the dough in half, made 16 miniature pretzels and froze the remaining dough.]

4. Roll one piece of dough at a time into a strip about 12 inches long. [Like Deb, I found that rolling the dough on an unfloured board was easier.] Twist into pretzel shape, transfer to a parchment-lined baking sheet and cover with a kitchen towel. Repeat with remaining dough.


I fear we will soon resemble these plump little guys, what with the
more-eating-than-exercising thing we've got going on here at Flour Child.

5. Fill a large, shallow pan with about 2 inches of water. [I used a saute pan.] Bring to a boil. Add 2 tablespoons sugar and baking soda and carefully stir until dissolved. Reduce to a simmer and transfer 3 or 4 pretzels at a time to the water. Poach for a minute on each side and transfer with a slotted spatula to a cooling rack set over a towel or baking sheet.


6. Heat oven to 450 degrees F. In a small bowl, whisk egg with 1 tablespoon water. Brush pretzels with egg glaze and sprinkle with salt.


7. Transfer pretzels back to the original parchment-lined baking sheet and bake for about 15 minutes or until evenly browned. [My oven has hot spots, so I rotated the sheet halfway through baking.]

The pretzels are best eaten warm on the day they're made, but according to Deb they can be stored, uncovered, for two days. I bagged and froze mine so that I could enjoy them one at a time, reheated in the microwave or oven.

Sunday, September 19, 2010

Sourdough English Muffins


If you're anything like me, you might have done the pretzel exercise in Bar Method class the other night and subsequently searched the Internet for the perfect sourdough pretzel recipe. You might have stumbled across Smitten Kitchen's English muffins post along the way, and found the idea of making a sourdough variation irresistible. Because you might have once been a bit obsessed with Thomas's sourdough English muffins, the rare and coveted breakfast treat your grandparents served by the plateful when you visited them during school breaks. Your grandparents might have slathered them in butter for fear you were going hungry and needed the extra calories, because your parents chose to raise you on a macrobiotic diet.

So... If you're anything like me, you might have spent your Saturday night making a batch of muffins and "sampling" more than your fair share of their tangy, pillowy goodness -- hot off the griddle and drenched in butter. You might have told yourself it was okay; that you were carbing it up for a long run the following day. But you might now be feeling more than a little guilty because this morning you went to Bar Method and tweaked your knee and worry you won't be able to run on it later.


But you might also be thinking it's worth it see the smile on your husband's face when you present him with a homemade egg and cheese muffin sandwich. And the delight with which your dog licks the runny egg left on the plate. Yep, if you're anything like me, you might be thinking, What a perfect Sunday morning. And... Why isn't my husband a hand model?

Sourdough English Muffins
Adapted from Ruth Reichl and Alton Brown via Smitten Kitchen
Makes about a dozen

Note: You will need a few metal baking rings for cooking these muffins. If you don't have or can't find baking rings, an empty tuna can with the top and bottom removed is purported to make an excellent substitute.

1 2/3 cup whole milk
3 tablespoons unsalted butter
1 cup sourdough starter*
1 egg
1 teaspoon kosher salt
5 cups all purpose flour, divided

1. In a small saucepan, heat the milk and butter over very low heat until the butter is just melted. Remove from heat.

2. In the bowl of a stand mixer fitted with the paddle attachment, combine the milk-butter mixture, sourdough starter, egg and salt. Add 2 1/2 cups flour and mix on medium-low speed until dough is smooth, about 5 minutes. [Note: a mixer makes this endeavor easier, but it's by no means necessary; hand mixing with a wooden spoon will work just fine]

3. Stop the mixer and add the remaining 2 1/2 cups flour. Mix for another 3-5 minutes, stopping the mixer and scraping the sides and bottom of the bowl as needed, until the flour is incorporated and a wet, shaggy dough forms. Remove bowl from mixer stand, cover and let rise for 1 hour.

4. Heat a griddle to 300 degrees F, or heat a skillet or griddle pan over a medium flame. Lightly coat the griddle and the insides of your baking rings with cooking spray. Fill each ring halfway with dough. (The dough is quite sticky and thick, making this a potentially frustrating process, so take a deep breath and  tell yourself it's worth it, because it is.) Cover with a cookie sheet and cook for 5-6 minutes. Remove the cookie sheet, flip the muffins in their rings with a spatula and tongs, re-cover and cook for another 5-6 minutes. Remove to a cooling rack and repeat with the remaining dough. Split with a fork and serve, or place in an airtight container and refrigerate for later.


*Sourdough Starter
Note: Allow two full days for the starter to develop before using.

1 cup warm water
2 tablespoons sugar
1 tablespoon active dry yeast
2 cups flour

In a large bowl, dissolve the sugar and yeast in the warm water. Stir in the flour. Cover tightly and store in a warm place for two days. Stir thoroughly before using.

Friday, September 17, 2010

Sweet Potato Brownies

Sweet potatoes and chocolate? Yes, please.


I can't even begin to describe how good these sweet potato brownies are, so I'm going to quote Laird: "These are better than regular brownies."

I agree. Make these. Now.


Sweet Potato Brownies
Adapted from wholeliving.com
Makes 12

6 tablespoons (3/4 stick) unsalted butter
2/3 cup natural (non-alkalized) cocoa powder
1/2 cup whole wheat pastry flour (recommended: Arrowhead Mills Organic)
1/2 teaspoon baking powder
1/4 teaspoon salt
1 1/2 teaspoons pumpkin pie spice
1 cup sugar
2/3 cup sweet potato puree (I pureed some sweet potatoes I'd roasted earlier in the week)
1 large egg
1 1/2 teaspoons pure vanilla extract

1. Heat oven to 350 degrees F and lightly coat an 8 x 8 x 2 inch baking pan with cooking spray.

2. In a small saucepan, melt the butter over very low heat. Remove pan from heat, add the cocoa powder and stir until a paste forms.

3. In a large bowl, whisk together the flour, baking powder, salt and pumpkin pie spice. Add the butter-cocoa mixture, sweet potato puree, sugar, egg and vanilla. Stir until thoroughly combined.

4. Spread the batter into the bottom of the prepared pan and even it with the back of a spoon or an offset spatula. Bake for about 20 minutes, until the top appears barely dry and moist crumbs adhere to a toothpick or knife inserted into the middle. Cool completely before slicing.


This happened, x 1/3 of the pan.
Good thing I had just gone to Bridget's a**-kicking. (Otherwise known as Bar Method.)
 P.S. You didn't really believe I wasn't going to say anything else, did you? I have to tell you, these brownies are impossibly rich and moist (hideous word, but it works here), and there are several variations I want to try:

- Adding orange oil or zest
- Making vegan substitutions for the butter and egg
- Using melted chocolate instead of the cocoa-butter mixture
- Swapping almond meal for wheat flour
- Substituting maple syrup for some of the sugar

And because the brownies are quite thin and cake-like (the flavor is less sweet and intense than traditional brownies), it occurred to me that they would be lovely layered with spiced cream cheese frosting.

Someone please stop me before I eat the entire pan.

Wednesday, September 15, 2010

Pan Roasted Black Sea Bass with Cheeky Zucchini Ribbons alla Marinara

Sometimes I blow my own mind with my culinary brilliance. And sarcasm. And cheekiness. ("Cheeky" is probably my most favorite of my husband's South Africanisms. I also love when he says I "chirp" and "cluck." And that he pronounces "hooves" like "WHO-vz.")

What also blows my mind is its unfailing tendency to daydream about cooking and baking all.the.time. Especially at work. Here's how last night's dinner came about.

Meeting, 9:24 a.m.
I need to make something with the rest of the zucchini in the fridge. Should I make zucchini muffins? Pleh. I don't want anything sugary. [I notice a colleague's grosgrain ribbon necklace and it reminds me of the butternut squash ribbons in Sunday's lasagna.] Hmm. I'll bet the zucchini would be good peeled into ribbons and sauteed with the end-of-summer tomatoes and basil from our CSA box. Like a pasta-less pasta alla marinara.


Conference Call, 11:49 a.m.
I'll flavor the sauce with the remnants of the shallots, onions and garlic that are hanging around. And that Basque olive mix left over from whoknowswhen we last had people over. And a splash of the sauvignon blanc Laird opened last night. I'll let everything simmer and reduce, then add the zucchini ribbons at the end to steam and soften for a few minutes.


Staff Meeting, 2:32 p.m.
So this dish is going to be enough for me for dinner, but not for Laird. He's going to need protein. Steak? Salmon? Hmm. [Boring rundown of protein thought process deleted.]

Whole Foods, 6:44 p.m.
I'm not feeling the steak. The salmon looks icky. The black sea bass looks amazing. I'll season it with salt and pepper and either poach it with the tomato sauce, or pan roast it in olive oil and butter. [Mmm this cheese sample is delicious. I think I'll buy a wedge of it to put in my fridge and forget.]


Yep. I think about food all.the.time.

It helps me get through my days.

And here's a recipe to help you empty your fridge (or CSA box or garden) and summon the last bits of Summer.


Pan Roasted Black Sea Bass with Cheeky Zucchini Ribbons Alla Marinara
Makes two generous portions

Note: I honestly didn't measure anything that went into this dish, but I do know the weights of the zucchini, tomatoes and sea bass, so there's that. Everything else about this recipe is an (experienced) approximation. You should also know that when I cook, I season with salt and pepper throughout. However I don't really address this until the end of my recipes, when I usually instruct you to "season to taste with salt and pepper." So all I can say is, season as you wish.

3 tablespoons olive oil, divided
1 medium shallot, minced
1/4 medium onion, minced
4 cloves garlic, peeled and minced
1 1/2 lbs tomatoes, such as plum, cut into large dice
1/4 cup olives, pitted and roughly chopped
1/2 cup chiffonade (of?) basil
1 1/2 lbs zucchini, sliced into long ribbons with a vegetable peeler
Salt and pepper
1 tablespoon butter
2 pieces black sea bass, about 1/2 lb each

1. Heat 2 tablespoons olive oil in a large saute pan or skillet. Add the shallot, onion, garlic, tomatoes, olives and basil. Saute over medium heat until mixture softens and begins to form a sauce, about 7-10 minutes. Add the zucchini ribbons, toss to combine, and cook for about 3-5 minutes or until the zucchini begins to soften. (The zucchini releases quite a bit of liquid, so I removed it from the pan to a dish, then simmered and reduced the sauce for about 5 more minutes.

2. Meanwhile, season fish with salt and pepper. In another large pan or skillet, heat 1 tablespoon olive oil with the butter until the butter solids begin to froth. Add the fish and cook for about 5-8 minutes on each side or until cooked through. Shhh, don't disturb the fish except to turn it over after the first side is cooked, otherwise you won't get a nice crust.

3. Pile zucchini ribbons in a pasta bowl or on a plate, arrange fish on top, and spoon marinara over.

4. Season to taste (at whatever point you wish) with salt and pepper. (See? Cheeky!)


P.S. Tony, this fish bone is for you.

Monday, September 13, 2010

Butternut Squash and Mushroom Lasagna

I haven't done much in the way of creative cooking, baking or food blogging since the dreaded five blog posts worth of Chocolate-Malt Cake craziness, nor have I eaten any sweets. (Apparently Chocolate-Malt Cake cures sugar addiction. Yay!) I've been gazing at heaps of gorgeous plums and pluots and apples at the farmers market and dreaming about making a clafoutis or Dutch bébé, but I just haven't been feeling it.

So for the past week, my husband has been eating lots of comfort and pub food -- bangers and mash, homemade chicken pies from the freezer and the like. But yesterday I was able to muster up enough motivation to make a butternut squash and mushroom lasagna. I had intended for it to be vegetarian but as far as my husband is concerned, a dish without meat does not a meal make, so in went some lean Italian turkey sausage. Paired with a simple green salad, it was a perfect Sunday supper.


Butternut Squash and Mushroom Lasagna
Makes 8-12 servings

Note: Most butternut squash lasagna recipes call for pre-cooked and mashed butternut squash, but I think using uncooked strips, cut from the squash with a vegetable peeler, is easier and much less soggy. Plus you can substitute the squash strips for lasagna noodles if you wish to make this dish pasta/gluten-free. Confession: I wasn't sure the squash strips were going to work, but they're brilliant (and I do say so myself).

1 1/2 lbs lean sweet Italian turkey sausage (optional)
2 tablespoons olive oil
3 medium shallots, minced
1 lb crimini mushrooms, cleaned and sliced
1 lb oyster mushrooms, cleaned and roughly chopped
Coarse kosher or sea salt
Freshly-ground black pepper
1 tablespoon chopped fresh thyme
Juice of 1/3 lemon
2 15-oz containers low-fat ricotta cheese
4 cups shredded part-skim mozzarella cheese
1 1/2 cups shredded Parmesan cheese
3 large eggs
1/4 cup chopped fresh parsley
1 teaspoon lemon zest (optional)
1 medium (approximately 1-1/4 lb) butternut squash
1 9-oz package no-boil lasagna sheets

1. Remove sausage (if using) from casings and saute in a large nonstick skillet over medium-high heat, breaking into small chunks and draining liquid as needed. Transfer to a medium bowl and set aside.

2. In the same pan, add olive oil and shallots and saute just until the shallots begin to turn translucent. Add the mushrooms and season with about 1/4 teaspoon each salt and pepper (the salt helps release the liquid from the mushrooms) and the thyme. Saute until the mushrooms begin to soften. Turn off heat and add the lemon juice, stirring to combine. Set aside.

3. In a large bowl, combine the ricotta, 1 1/2 cups mozzarella, 3/4 cup Parmesan, eggs, parsley and lemon zest (if using). Set aside.

4. Using a vegetable peeler, remove and discard the tough outer skin from the butternut squash, then peel the flesh into long strips. You will need enough strips to line the lasagna pan with two layers of squash (five if substituting squash for the noodles).

5. Heat oven to 350 degrees F and coat a 9 x 13 x 2 inch baking dish with cooking spray. Assemble the lasagna: spread about 1 cup ricotta mixture evenly into the bottom of the prepared dish and place three lasagna noodles horizontally on top. Spread another cup ricotta mixture on top of the noodles, then arrange squash strips on top. Arrange half the sausage and half the mushrooms on top of the squash, then sprinkle with about 1 cup shredded mozzarella. Repeat with 3 more lasagna noodles, another cup ricotta, another layer of squash strips, the remaining sausage and mushrooms, and another 1 cup mozzarella. Top with 3 more lasagna noodles, followed by the remaining ricotta, mozzarella and Parmesan. (Lasagna can be covered tightly and frozen at this point.)

6. Cover lasagna with foil and bake on middle oven rack for 25 minutes. Remove foil, rotate pan front-to-back, and bake for another 25 to 35 minutes or until the lasagna is bubbling and brown on top. Remove from oven and let cool for 10 minutes before serving.

Please forgive my less-than-stellar photos with inconsistent camera angles. That's what you get at 9 p.m. on a Sunday.

Tuesday, September 07, 2010

Quinoa-Stuffed Baked Apples

I've got lots of Labor Day weekend stuff to tell you about but I'm feeling super blah today thanks to gloomy weather, the beginnings of a cold and a horrible night's sleep (call us Mr. and Mrs. Thrasher Shark). Meh.

Also "meh" are these these quinoa-stuffed baked apples. Well, I thought they were good but Mr. Thrasher Shark didn't agree. And I didn't even bias him against them by disclosing their gluten-free, cane sugar-free and vegan status.

I was excited about this project because nothing says Fall (my favorite season) like the smell of apples and spices wafting through the house. However, thanks to my Momofuku cake-induced sugar overload, I challenged myself to make a healthier, more nutritious version sans butter and sugar. (At this point I don't care to let either of those things pass my lips again, but ask me in a few days...)

This recipe fits the bill on all counts, but if I make it again I'll probably swap out the quinoa and walnuts for rice and almonds because the former are a tad bitter. If you make this recipe I'd love your feedback.


Quinoa-Stuffed Baked Apples
Makes 6 servings
Note: I only measured the cider and quinoa, so all other quantities are approximations.

1 750-ml bottle (about 3 1/4 cups) 100% apple cider
3/4 cup quinoa, rinsed
6 baking apples (such as Granny Smith or McIntosh)
1/3 cup whole old fashioned oats (use certified gluten-free if gluten is an issue)
1/2 cup chopped walnuts
1/2 cup raisins or currants
1 tablespoon pure maple syrup
Juice of 1 lemon
1 teaspoon pumpkin pie spice
1/2 teaspoon cinnamon
1/4 teaspoon salt

1. Preheat oven to 375 degrees F. Measure 1 1/2 cups apple cider into a saucepan and add the quinoa. Bring to a boil, then reduce heat and simmer for 15 to 20 minutes or until the liquid is absorbed.

2. Meanwhile, wash the apples and trim the bottoms so that they stand upright. Use a melon baller or grapefruit spoon to core and hollow out the interior flesh to about 1/2 inch from the exterior. Reserve the non-core flesh for the stuffing and arrange the prepared apples in a 9 x 13 inch baking dish.


3. Transfer the cooked quinoa to a medium bowl and add the oats, walnuts, raisins or currants, maple syrup, lemon juice, spices and salt. Roughly chop the reserved apple flesh and add it to the quinoa mixture. Toss to combine and moisten with about 1/4 cup apple cider.


4. Evenly spoon the quinoa mixture into the prepared apples and pour the remaining apple cider (about 1 1/2 cups) into the bottom of the baking dish. Bake for 20 minutes, then tent with foil and bake for another 30 to 40 minutes or until the apples are soft. Spoon pan juices over the apples and serve with cream or yogurt, if desired.

Sunday, September 05, 2010

Momofuku Chocolate-Malt Cake Challenge: The Final Act

Friends, the Momofuku Chocolate-Malt Cake Challenge is finis.

Good riddance.


The cake is (obviously) very difficult to slice and plate, and it doesn't taste as malted as I'd hoped. It tastes more like... sweet. Sweet as in my heart started racing and pounding, I got the sweats and the shakes, was overcome with nausea, and had to lay down for a couple of hours. I kid you not.


My husband love love loved it. He ate a big slab warmed in the microwave for 30 seconds and topped with two scoops of Alden's organic vanilla bean ice cream.

He did not have to lay down after.

Friday, September 03, 2010

Momofuku Chocolate-Malt Cake Challenge: Assembly (Part One)

In today's installment of the Momofuku Chocolate-Malt Cake Challenge, I tackled Part One of The Assembly. (Yes, there are two parts.) The photos pretty much speak for themselves, so I'll just note that as I was constructing this Dr. Seuss-like creation, I kept thinking that it's even more mind-blowing in practice than in theory. It's one thing to read the recipe and the tutorial, and it's another to actually put it all together. See for yourself.


For the first and second layers, you brush the cake with a mixture of 3 tablespoons Ovaltine and 1/2 cup milk, spread with Malt-Fudge Sauce, sprinkle with Chocolate-Malt Crumbs, drizzle with more Malt-Fudge Sauce, top with marshmallows, then char them with a kitchen torch.

Phew.

Then you top the whole thing with the third cake layer (not pictured), brush it with the Ovaltine-milk mixture, cover with plastic wrap, and chill it overnight.

Tomorrow I'll be removing the cake from the fridge, pouring the remaining Malt-Fudge Sauce over it, mounding marshmallows on top, charring them with my torch, and sprinkling the remaining Chocolate-Malt crumbs over. Then, after letting it stand at room temperature for 3 hours, we'll finally slice into this baby. Are you so over it yet? I almost am, but not quite...

Chocolate-Malt Cake Challenge, Phase Two: A Turn for the Worse

The Momofuku Chocolate-Malt Cake Challenge has taken a turn for the worse. Last night was Phase Two: Cake Layers. Everything was smooth sailing until the batter went into the oven. Then this happened:


Here's the deal: I thought the cakes might sink. The recipe doesn't specify whether one should use non-alkalized (natural) or alkalized (Dutch-process) cocoa. Judging from the burnt sienna hue of the cake layers pictured in Bon Appetit, I suspected it was alkalized. The leavening agent (baking powder) in the recipe would also suggest this, but the acid (buttermilk) sort-of contradicts it. The point is, I thought the leavening would be off and it was. Were I to make this again -- and I probably will -- I would use non-alkalized cocoa and add baking soda.

The recipe -- which I'll be updating upon further testing -- is interesting in that it calls for butter and vegetable oil; sugar and corn syrup; melted chocolate and cocoa.

Chocolate-Malt Cake
Recipe: Christina Tosi via Bon Appetit
Makes three 8-inch layers

Nonstick vegetable oil spray
2 ounces bittersweet chocolate (70% to 72% cacao), chopped [I used Valrhona 70%.]
1 3/4 cups all purpose flour
3/4 cup unsweetened cocoa powder [I used Valrhona, which is alkalized.]
2 teaspoons baking powder
1 teaspoon coarse kosher salt
3/4 cup (1 1/2 sticks) unsalted butter, room temperature
2 1/4 cups sugar
3 tablespoons light corn syrup
3 large eggs
3/4 cup buttermilk
1/3 cup vegetable oil
1 teaspoon vanilla extract

1. Heat oven to 350 degrees F. Coat three 8-inch cake pans with nonstick spray. Line bottom of each pan with parchment round; coat parchment with nonstick spray.

2. Place chocolate in small microwave-safe bowl. Melt in microwave in 15-second intervals just until melted, stirring occasionally. Set aside.

3. Sift flour, cocoa powder, baking powder, and coarse salt into medium bowl.

4. Combine butter, sugar, and corn syrup in large bowl of stand mixer fitted with paddle attachment.; beat on medium-high speed until fluffy and pale, about 2 minutes. Scrape down sides of bowl. Add eggs, one at a time; beat on low speed to incorporate, then increase speed to medium-high and beat until mixture is fluffy, about 2 minutes. Scrape down sides of bowl.

5. Add melted chocolate. Beat until blended, about 1 minute. Add buttermilk, oil, and vanilla; beat on medium-high speed until pale brown, about 2 minutes. Add dry ingredients; beat on low speed just until blended, about 45 seconds. Divide batter among pans; smooth tops.

6. Bake cakes until tester inserted into center comes out clean, about 20 minutes. Cool completely in pans on racks. [Note: My cakes baked for a full 35 minutes.]

Writing these Chocolate-Malt Cake posts makes me want to go searching for chocolate. How about you?

Thursday, September 02, 2010

Momofuku Chocolate-Malt Cake, Phase One: Crumbs and Fudge Sauce

Last night was Phase One of the Momofuku Chocolate-Malt Cake Challenge: making the Milk Crumbs, Chocolate-Malt Crumbs and Malt-Fudge Sauce. It began with a post-work trip to the supermarket for ingredients I never buy and therefore had difficulty locating. (When did the Ovaltine packaging change? Is corn syrup in the baking aisle or with the honey and jam?) When I got home I quickly made the Milk Crumbs and left them to cool while I went to Bar Method for an hour. Next up were the Chocolate-Malt Crumbs and the Malt-Fudge Sauce. All three are now awaiting their fate as part of Dessert Challenge History.

On the docket for tonight: make the cake layers after a 6 mile run. Tomorrow is Assembly Day and a one hour tempo run.


Milk Crumbs
Milk Crumbs
Makes about 2 cups

3/4 cup nonfat dry milk powder
1/2 cup all purpose flour
3 tablespoons sugar
2 tablespoons cornstarch
3/4 teaspoon coarse kosher salt
6 tablespoons (3/4 stick) unsalted butter, melted

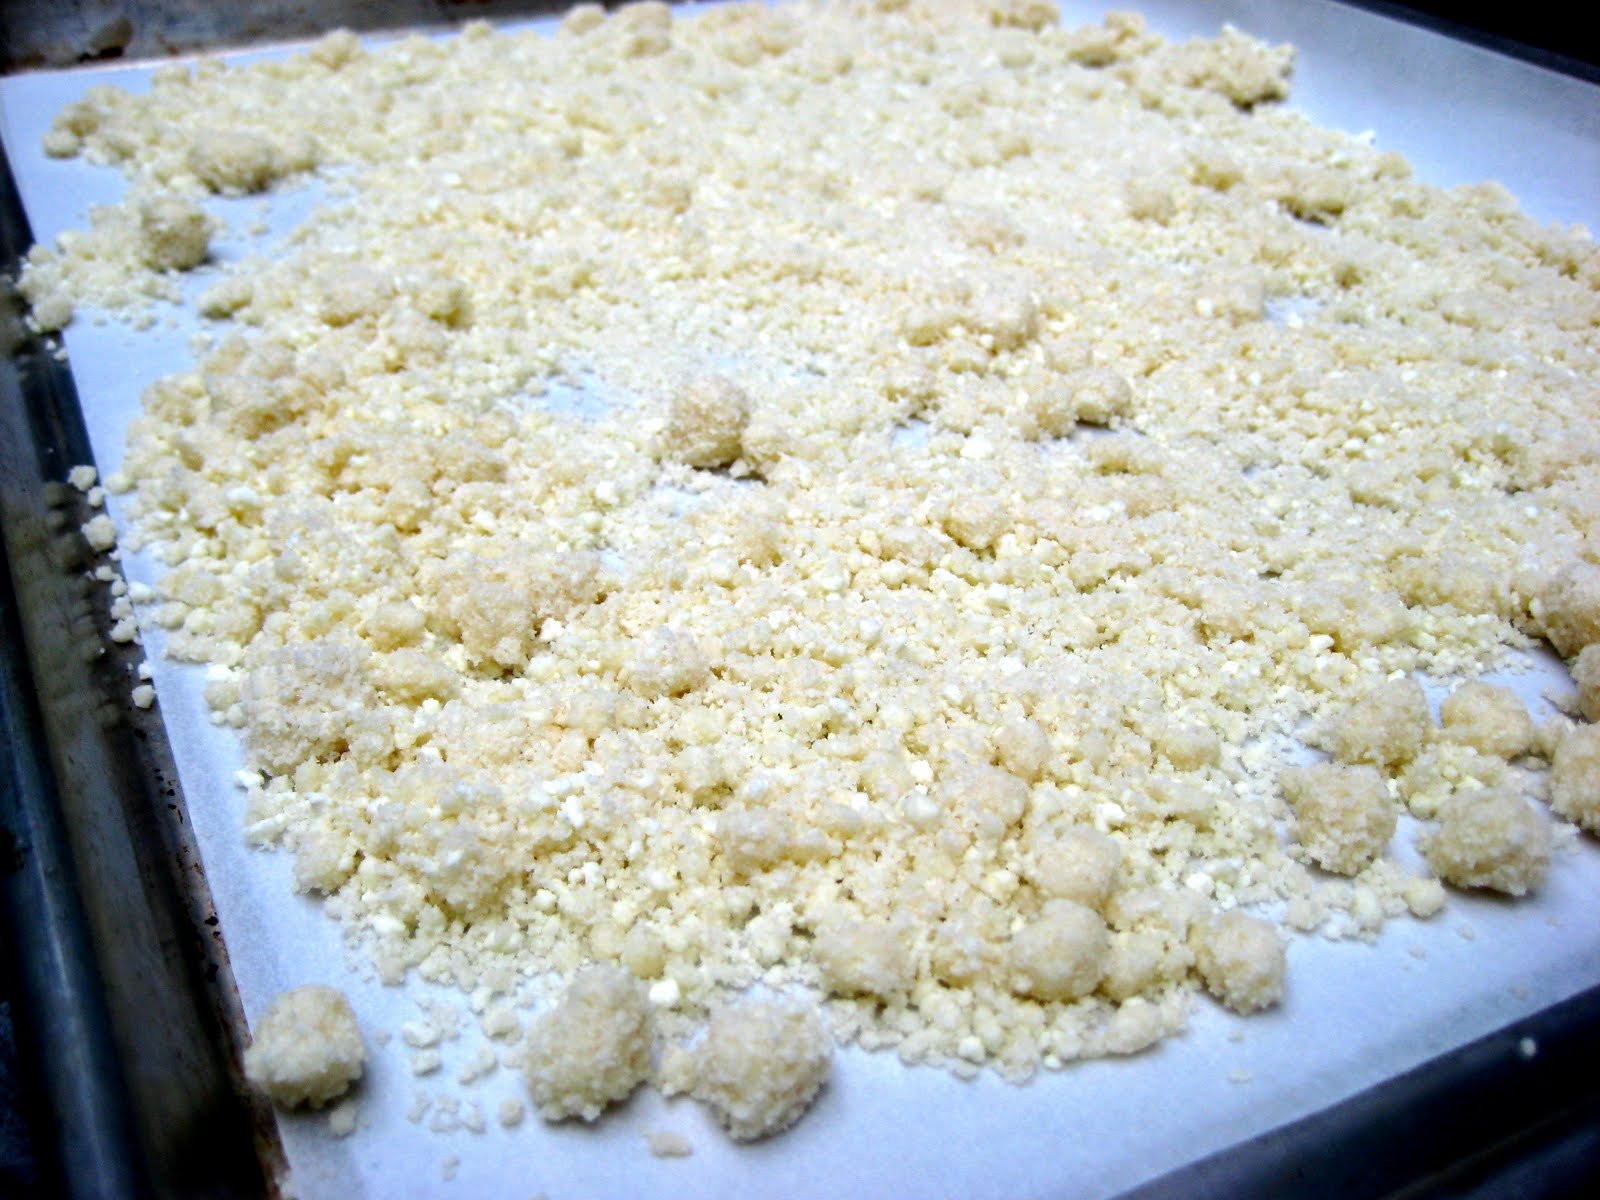
Heat oven to 275 degrees F and line a large rimmed baking sheet with parchment. Combine milk powder, flour, sugar, cornstarch and salt in medium bowl; toss to mix evenly. Add butter; stir with fork until clusters form. Spread mixture evenly on prepared sheet.Bake until crumbs are dry and crumbly but still pale, about 10 minutes. Cool completely on sheet.

Note: Can be made one week ahead. Store in airtight container at room temperature.


Chocolate-Malt Crumbs

Chocolate-Malt Crumbs

2/3 cup Milk Crumbs
6 tablespoons Ovaltine Chocolate Malt Mix
1 1/2 ounces high-quality white chocolate, chopped [I used Green & Black's Organic.]

Mix Milk Crumbs and Ovaltine in small bowl. Place white chocolate in small microwave-safe bowl. Heat in microwave in 15-second intervals just until melted, stirring occasionally. Drizzle chocolate over Milk Crumb mixture; toss to coat.


Malt-Fudge Sauce

Malt-Fudge Sauce

1 1/3 cups Ovaltine Chocolate Malt Mix
4 ounces bittersweet chocolate (70% to 72% cacao), chopped [I used Valrhona 70%, which I buy in bulk.]
1 teaspoon mild-flavored (light) molasses
Pinch of coarse kosher salt
1/2 heavy whipping cream
1/2 cup light corn syrup
1/4 cup sugar

Place first four ingredients in medium bowl; set aside. Combine cream, corn syrup and sugar in heavy medium saucepan. Bring to a boil, stirring until sugar dissolves. Pour cream mixture over chocolate mixture in bowl. Let stand 1 minute, then stir until smooth. Whisk until sauce is glossy, about 1 minute.

Note: Can be made one week ahead. Cool completely, cover and chill. Rewarm just until pourable until using.

P.S. I'm getting excited about this cake. I adore pretty much anything chocolate malt because when I was a kid, my mom would occasionally buy me a Carnation frozen chocolate malt cup to nurse on the way home from the dentist. (Typically my treat was fruit-on-the-bottom yogurt from the co-op.) This is probably the reason I've never minded going to the dentist. Or Dodgers games. (Okay, that last part isn't true. They may sell those Carnation malt cups at Dodger Stadium, but baseball is bo-ring.)

Momofuku Chocolate-Malt Cake Challenge

Photo: Christopher Griffith for Bon Appetit

Leave it to a pastry chef to create a dessert so complicated, recreating it requires a tutorial, an Inception-like recipe-within-a-recipe and 20 hours of your time start to finish. (And a blowtorch, but that's not so unusual.)

Meet Christina Tosi, pastry chef/owner at Momofuku Milk Bar and creator of the Chocolate-Malt Cake pictured above.

Photo: Christopher Griffith for Bon Appetit

I've long been intrigued by all things Momofuku (I'm still bummed we didn't make it there for the fried chicken dinner the last time we were in NYC), so I was delighted to open the latest issue of Bon Appetit and find a feature on Ms. Tosi with recipes for three of her signature treats. (The other two are Crack Pie -- oh yeah -- and Blueberry and Cream Cookies.)

[How 'bout them hyperlinks so far.]

I don’t often make super involved recipes with ingredients like dry milk powder and Ovaltine Chocolate Malt Mix, but I can't resist the lure of a "Dr. Seuss-like" cake developed by someone whose creations Bon Appetit describes as "insane," "mind-blowing" and "delicious madness."

Nor can I resist a recipe that taunts me. It's as if it's whispering from the page, I dare you."

So to that I reply, It's on.